 Cropped
Help
Cropped
Help
Help / Capture & annotate
Make step-by-step guides
A guide is a set of screenshots in order, each with marks that point things out and a caption that says what to do. Every step follows one guide style, so the whole guide looks the same, and changing the style restyles every step at once.
Quick answer: in the Studio, click Guides at the top left, click New guide, then drop your screenshots or click Add screenshots. Mark each step with a callout, arrow, label or numbered badge, type a caption, then click Export guide to save every step as a picture with a Markdown file.
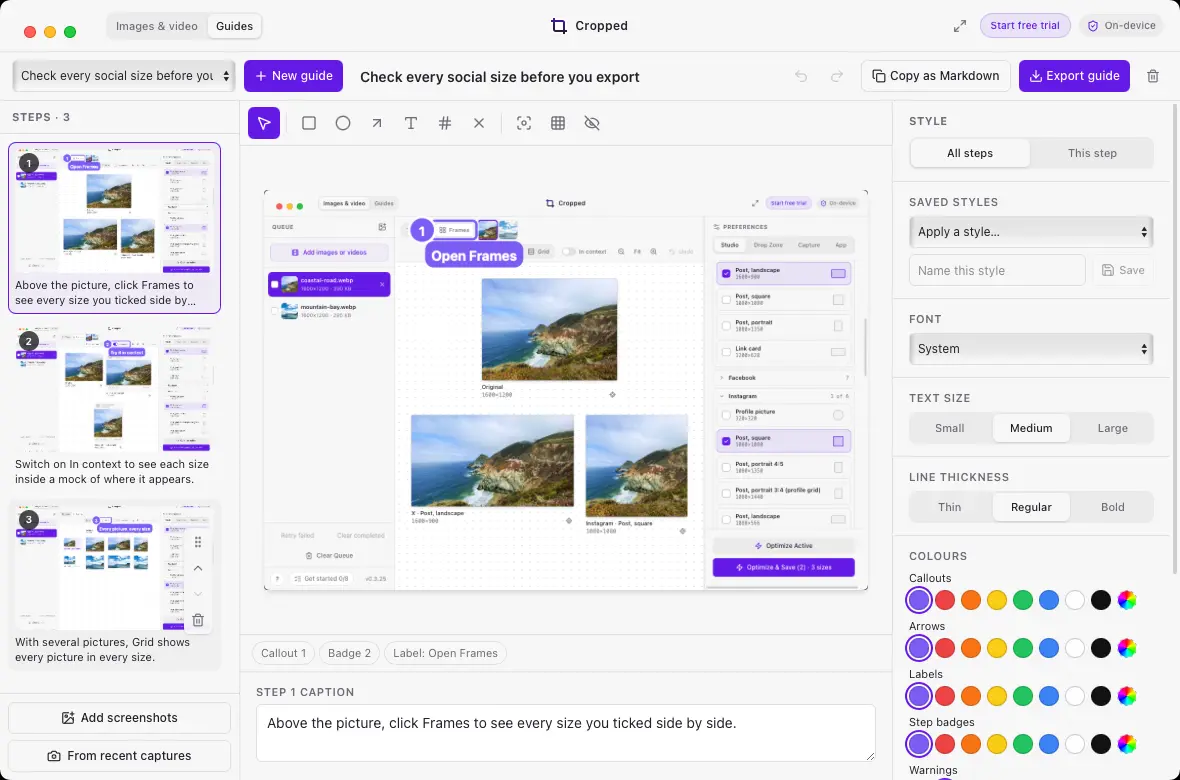
Guides works the same on Windows and Linux: see a guide on Windows and on Linux.
Create a guide
- Open the Studio and click Guides at the top left. Images & video takes you back to the queue.
- Click New guide and type a title over Guide 1.
- Add steps:
- Click Add screenshots, or press ⌘ Command + O (Ctrl + O on Windows and Linux).
- Drop several screenshots on the window at once. Each one becomes a step, in the order you dropped them.
- Click From recent captures and pick screenshots from your capture history.
Cropped keeps its own copy of each screenshot with the guide, so your original files are never changed, moved or needed again. Guides are saved as you work and are still there after you quit and reopen Cropped. Pick another guide from the menu at the top left.
Reorder and delete steps
Drag a step in the list to move it, or point at it and click the up or down arrow. Click the bin to delete a step, and ⌘ Command + Z (Ctrl + Z on Windows and Linux) to bring it back.
Mark up each step
Pick a tool above the screenshot or press its letter key, then drag on the screenshot. A click without a drag places a mark of a useful size.
| Tool | Key | What it's for |
|---|---|---|
| Select and move | V | Select a mark, drag it to move it, drag a handle to resize it |
| Callout box | R | A box around the thing to click |
| Callout circle | O | A circle around it instead |
| Arrow | A | Points from one place to another |
| Label | T | A short note on the picture |
| Step badge | N | A numbered circle; badges count up 1, 2, 3 on each step |
| Warning | X | Crosses something out: what not to click |
| Highlight | F | Dims everything else |
| Blur | B | A mosaic over private details |
| Hide | H | A solid block that removes them |
Double-click a label to change its words, and drag its left or right side to change where it wraps. Press Delete to remove the selected mark, the arrow keys to nudge it (hold ⇧ Shift for bigger steps) and Esc to deselect. Undo and redo work for everything: ⌘ Command + Z and ⇧ Shift + ⌘ Command + Z (Ctrl + Z and Ctrl + Shift + Z on Windows and Linux).
Type what the reader should do in the caption under the screenshot, like “Click Export in the top-right corner.” Captions go under each picture in the Markdown file.
Guide style and changes to one step
The Style panel on the right sets how marks look: font, text size, line thickness, a colour for each kind of mark (callouts, arrows, labels, step badges and warnings), the badge style, filled or plain labels, and an optional frame that puts each picture on a background with padding, rounded corners and a soft shadow. Drag the panel's left edge to make it wider, or double-click the edge to put it back.
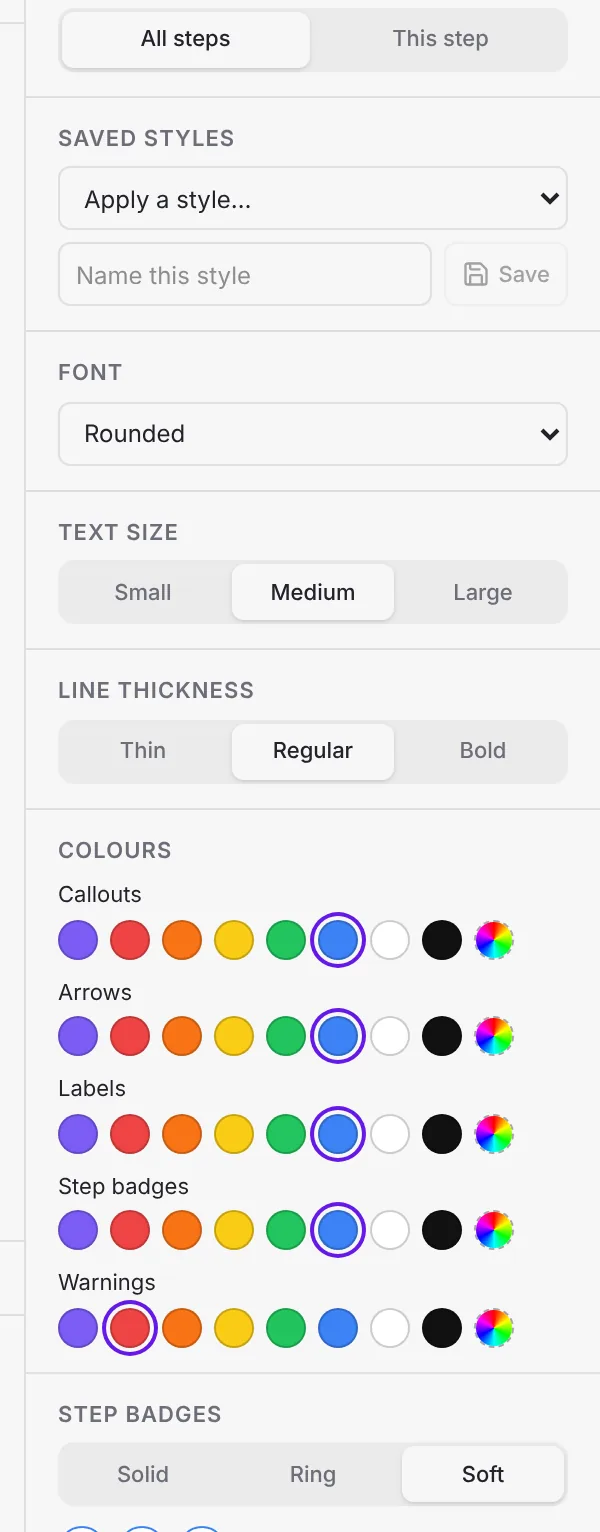
At the top of the panel, choose what a change applies to:
- All steps changes the guide style, so every step changes together.
- This step changes only the selected step. With a mark selected it reads This mark and changes only that mark.
A changed setting shows an amber dot, and steps with their own changes show one in the step list too. These changes stay when you change the guide style later: make every callout blue, and the one callout you made red stays red. Click Reset to guide style to drop a step's or a mark's own changes.
Saved styles
Under Saved styles, pick a style from Apply a style to use it on every step: Cropped, Classic red, Calm blue, Docs frame or Marker. To keep your own, type a name and click Save; your saved styles appear in every guide and in your AI app. Saving with a name you've used before replaces that style.
Export a guide
Click Export guide. Cropped draws each step with its marks and frame, optimizes it with your current Studio settings (format, quality and size), and saves the pictures and a Markdown file in a new folder named after the guide, inside your Studio output folder. Pictures are numbered with their captions, like 01-open-settings.webp, and the Markdown lists the steps in order with each caption and picture.
Copy as Markdown copies the same Markdown without exporting. Its picture names match what Export guide saves, so you can paste it into a README, a help centre or an issue and add the pictures next to it.
Ask your AI to build a guide
When your AI app is connected to Cropped, it can make guides for you with Create a guide, Add a step, Set the guide style, List guides and Export a guide. Open Guides in the Studio while it works: each step appears as the AI adds it, and you can fix any mark or caption yourself.
Try:
- “Use Cropped to make a step-by-step guide that shows how to export a report from this app.”
- “Make every callout in the Export a report guide blue and use the Docs frame style.”
- “Add a step to my onboarding guide from my last screenshot, with a badge on the Save button.”
- “Export the Export a report guide as PNG.”
The Document a feature prompt in your AI app's prompt menu walks through the same steps. On a Mac with Let AI apps capture without asking on, the AI can capture each window and find buttons by their words so the marks land exactly.
Still stuck? Click the ? button at the bottom left of the Cropped Studio to ask, send us a message, or request a feature.