 Cropped
Help
Cropped
Help
Help / Capture & annotate
Record your screen
Record any part of your screen as a video, with or without sound. When you stop, the recording waits in the Drop Zone so you can trim the start and end before Cropped saves a small, shareable copy.
Start and stop a recording
- Press ⇧ Shift + ⌘ Command + 0 (Windows: Ctrl + Shift + 0), or click Record in the Drop Zone.
- Drag over the area to record. Move or resize it if needed.
- Check the toolbar under the area, then click Record this area (or press Return).
- To stop, press ⇧ Shift + ⌘ Command + 0 again, click Stop in the recording bar, or click Stop in the Drop Zone.
You can also start a recording from an area screenshot: drag the area with ⇧ Shift + ⌘ Command + 8, then pick the record button instead of the camera.
The toolbar before you record
| Button | What it does |
|---|---|
| Take screenshot | Captures a still image instead |
| Record this area | Starts recording |
| 3s timer | Runs the main button after a countdown (Mac): recording when you started with the record shortcut or Record, a screenshot otherwise. Hover it to pick 3, 5 or 10 seconds |
| Computer sound | Records the sound your computer plays (Mac only) |
| Microphone | Records your voice |
| Camera | Shows your camera in a bubble inside the area and records it with the screen (Mac). Always off until you turn it on |
| Pointer | Shows or hides the mouse pointer in the video |
| 30 / 60 / 120 | Frame rate. Click to cycle between them. 120 needs a 120 Hz screen |
| Cancel | Closes the picker (Esc) |
Your sound, pointer, frame rate and timer choices are remembered for next time. The camera starts off every time.
Record your camera with the screen
On Mac, click Camera on the toolbar to add a camera bubble to the recording. The Mac asks for camera access the first time.
- Move it: drag the bubble anywhere inside the area. It stays inside the area, so it's always in the video.
- Resize it: drag its edge, or hover it and pick S, M or L.
- Change its shape: hover it and pick round, beveled (rounded corners) or square.
- Turn it off: click Camera again, or hover the bubble and click ×.
The bubble is recorded exactly as you see it. Its hover controls are never recorded. Cropped remembers the shape, size and spot, but the camera itself is always off until you turn it on.
Count down before recording
Start with ⇧ Shift + ⌘ Command + 0 or Record, choose the area, then click the timer button (for example 3s) next to Record this area. A countdown shows beside the area, which stays outlined, and recording starts when it reaches zero. Click the countdown to cancel. To change the wait, hover the timer button and pick 3s, 5s or 10s.
While recording
A small recording bar shows the time and four buttons:
- Pause and Resume. The paused part is left out of the video.
- Restart throws away what you've recorded and starts again on the same area with the same options.
- Discard stops and deletes the recording.
- Stop saves it.
The Drop Zone also shows "Recording 0:42" with Pause and Stop. Cropped's own windows and the recording bar are left out of the video.
Trim and optimize
When you stop, the recording appears on a card in the Drop Zone with a trim bar.
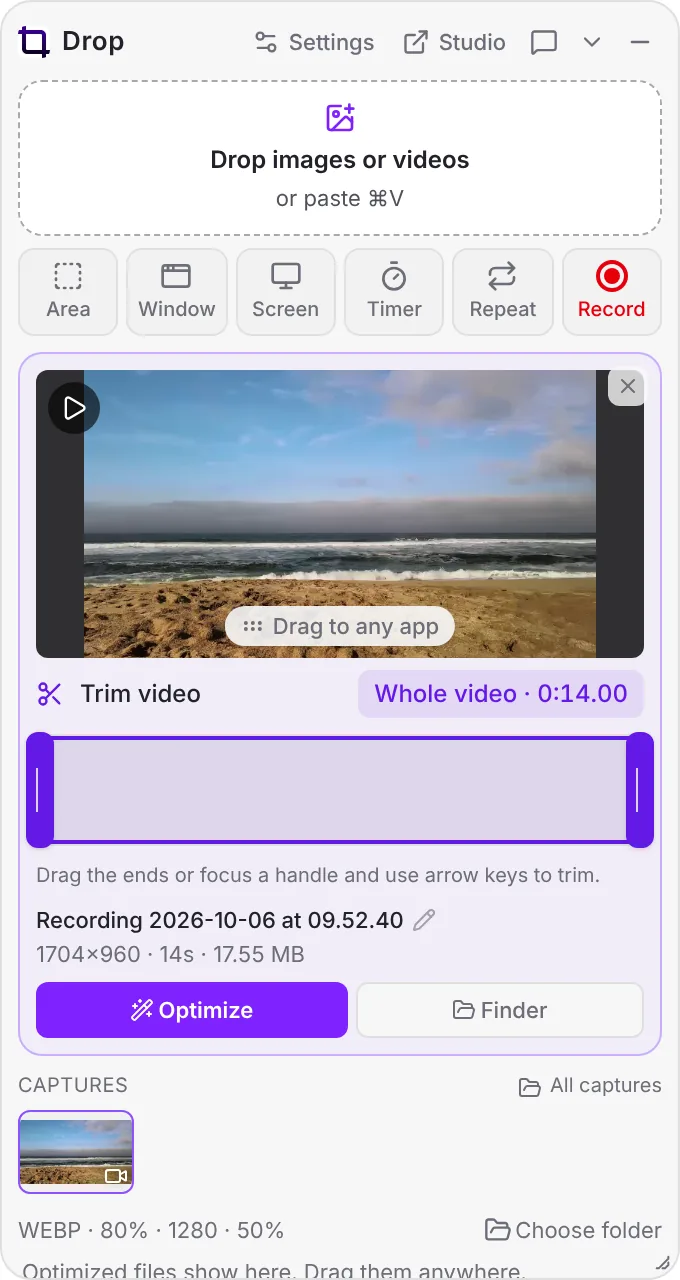
- Press play to watch it. Playback stays inside the part you keep.
- Drag the start and end handles to cut off the beginning and end. With a handle selected, the arrow keys move it by one frame and Shift-arrow by one second.
- Click Trim & optimize. Cropped saves only the part you kept, using your recording preset.
The full original recording is always kept in your capture history. To pick several separate parts of a recording, open it in the Studio and use the clip picker.
If you'd rather skip this step, turn off Trim before optimizing in Preferences › Capture. New recordings are then optimized as soon as they stop.
Recording settings
Find these in Preferences › Capture › Recordings.
| Setting | Choices | Default |
|---|---|---|
| Sound | No sound, Computer sound, Microphone, Sound + mic | No sound |
| Frame rate | 30 fps, 60 fps, 120 fps (120 Hz screens only) | 30 fps |
| Preset | Drop Zone preset, any video preset, or Original recording | Drop Zone preset |
| Trim before optimizing | On or off | On |
| Show the pointer | On or off | On |
| Show the Drop Zone | On or off | Off |
120 fps recording
120 fps works only on a 120 Hz screen. The option appears when a connected screen refreshes at 110 Hz or faster, such as a MacBook Pro with ProMotion or a 120 Hz monitor. On a 60 Hz screen, a recording set to 120 fps is made at 60 fps, and the setting shows "(60 on this screen)".
Optimized copies are capped at 60 fps to keep files small, unless the preset sets its own frame rate. Choose the Original recording preset to keep every frame. Large areas at 120 fps are saved with HEVC.
Sound
- Computer sound records what your Mac plays: app sounds, a video, a call.
- Microphone records your voice. On Mac this needs macOS 15 or later. The Mac asks for microphone access the first time.
- Sound + mic mixes both into one audio track.
File format and size
Recordings are made as .mov files with H.264 video (HEVC for large areas above 60 fps), up to 3840 × 2160 on Mac. The optimized copy uses your chosen preset, which is H.264 MP4 up to 1080p by default. See Video formats and presets for every option.
Still stuck? Click the ? button at the bottom left of the Cropped Studio to ask, send us a message, or request a feature.