 Cropped
Help
Cropped
Help
Help / Crop, optimize & export
Optimize and compress images
Cropped turns large photos and screenshots into small files that look the same. Pick a preset, or set the format, quality and size yourself. Your original is never changed.
Pick a preset
Under Studio output › Image, choose a Preset. Each one sets the format, quality and size in one go.
| Preset | Format | Quality | Max width | Good for |
|---|---|---|---|---|
| Web | WebP | 85% | 1920 px | Websites and blogs (Studio default) |
| Share | JPEG | 82% | 1600 px | Email and apps that don't open WebP |
| Agent / LLM | WebP | 80% | 1280 px, then 50% | Pasting into ChatGPT, Claude or other AI tools with fewer tokens (Drop Zone default) |
| PNG | Lossless | Original | Printing and archiving | |
| Web · compact | WebP | 78% | 960 px | Thumbnails and small embeds |
| Web · AVIF | AVIF | 65% | 1920 px | The smallest files for modern browsers |
| Photo · high quality JPEG | JPEG | 92% | 2560 px | Photographers and portfolios |
| Thumbnail · WebP | WebP | 80% | 640 px | Product grids and previews |
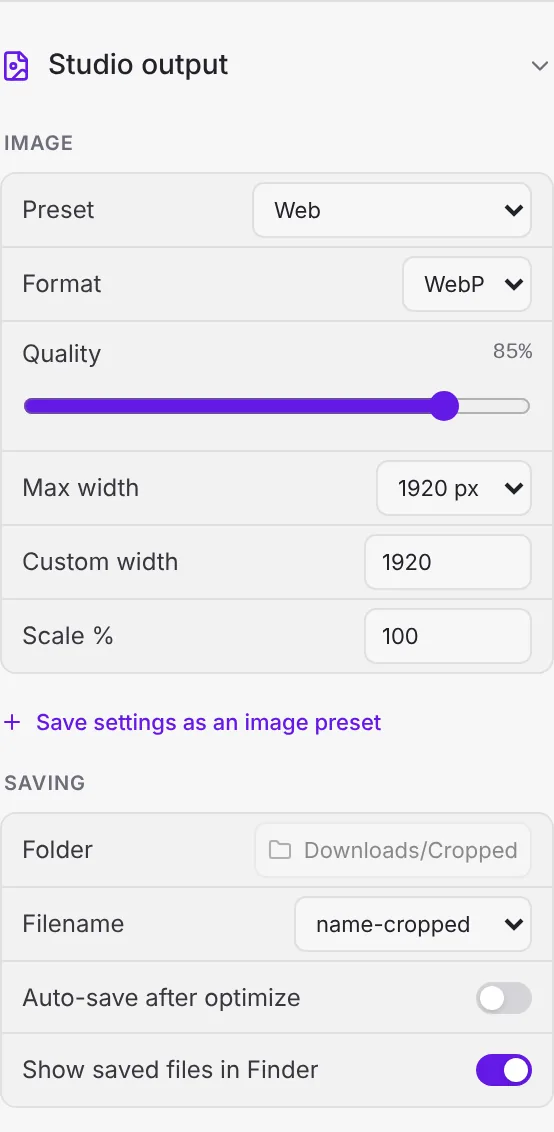
Format, quality and size
| Setting | Choices |
|---|---|
| Format | WebP, AVIF, JPEG or PNG. WebP, AVIF and PNG keep transparency. JPEG fills transparent areas with white. |
| Quality | 1 to 100%. Lower is smaller. Start around 80% and lower it until you can see a difference. Hidden for PNG, which is lossless. |
| Max width | Original, 3840, 2560, 1920, 1280 or 1080 px, or type a Custom width. Images are never enlarged. |
| Scale % | Shrinks the result further, from 1 to 100%. |
Which format should I use?
- WebP is the best all-rounder: small, sharp, and works in every modern browser and most apps.
- AVIF is often smaller still, but takes longer to make and some older apps can't open it.
- JPEG opens everywhere, including old email clients and print shops.
- PNG is lossless. Use it for print, pixel art or when you need an exact copy.
Save your own preset
Change any setting, then click Save settings as an image preset and give it a name. Your presets show up in the Studio and in the Drop Zone. Changing a preset's settings updates it; save a copy to keep both versions.
Optimize
- Press ⌘ Command + ↩ Return (Windows: Ctrl + Enter) or click Optimize to process the whole queue.
- Optimize Active processes only the open image.
- After optimizing, File size shows the original size, the new size and how much you saved.
Saving and file names
Under Studio output › Saving:
| Setting | What it does |
|---|---|
| Folder | Where files are saved. Downloads/Cropped unless you pick another. New folder makes one, and Show in Finder opens it. |
| Filename | name-cropped (photo-cropped.webp), name-optimized (photo-optimized.webp), Same name (photo.webp) or Custom ending (for example -web). |
| Auto-save after optimize | Saves as soon as each file is optimized. Off by default, so you can check results first and press ⌘ Command + S. |
| Show saved files in Finder | Opens the folder after saving. On by default. |
Cropped never overwrites a file. If the name is taken, it adds -2, -3 and so on. The naming style is shared with the Drop Zone.
Still stuck? Click the ? button at the bottom left of the Cropped Studio to ask, send us a message, or request a feature.