 Cropped
Help
Cropped
Help
Help / Crop, optimize & export
The Studio window
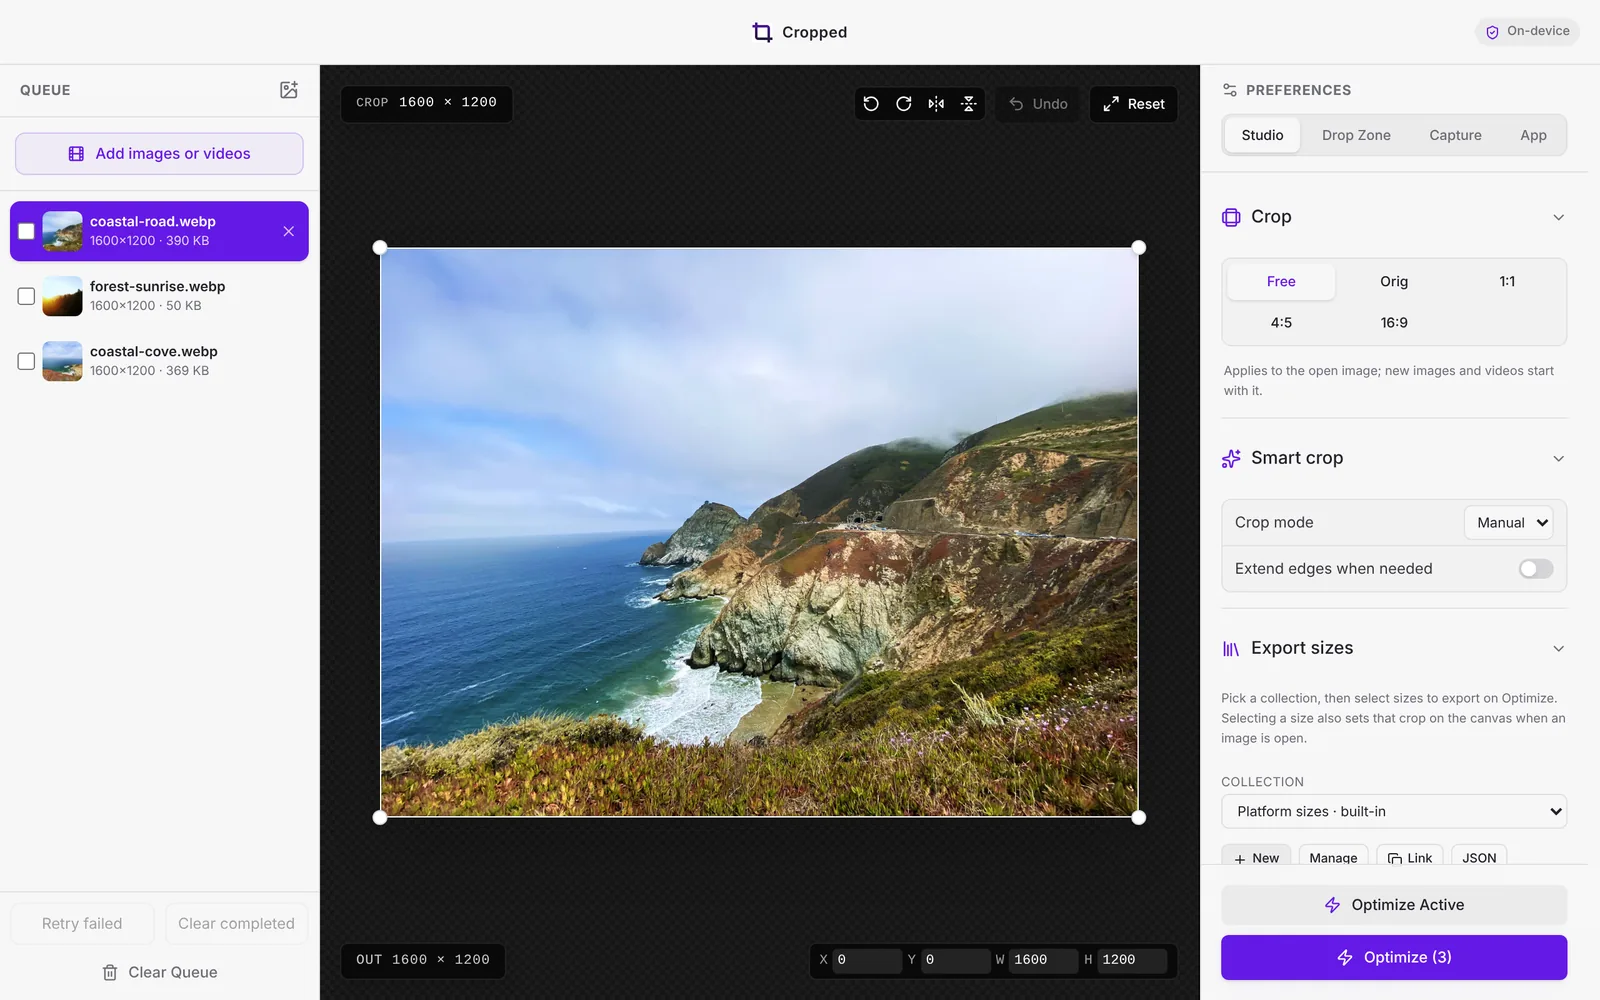
The Studio is Cropped's main window. Use it when you want control: crop each image, trim a video, export several social sizes at once, or pick an exact format and quality. For quick one-step shrinking, use the Drop Zone instead.
Add files
- Click Add images or videos, or press ⌘ Command + O (Windows: Ctrl + O).
- Or drag files or whole folders onto the Studio window. Files dropped here are added to the queue but not optimized yet, so you can adjust them first.
Cropped opens PNG, JPEG, WebP, AVIF and HEIC images, and MP4, MOV, M4V, WebM, MKV, AVI, MPEG and GIF videos.
The queue
The left column lists everything you've added.
- Click a file to open it. ↑ Up arrow and ↓ Down arrow move between files, and Delete removes the selected one.
- Hover a file to show it in Finder (or File Explorer) or remove it with ✕.
- Tick the checkboxes, then click Apply to Selected to copy the open file's settings to the ticked files of the same type. Crops and trims stay separate for each file.
- At the bottom, a summary shows how much you've saved, plus Retry failed, Clear completed and Clear Queue.
The editor
The middle shows the open file.
- Images: drag the crop box, rotate, flip and type exact sizes. See Crop and export sizes.
- Videos: play, crop, trim and pick clips. See Edit videos.
Preferences
The right side has four tabs:
| Tab | What's in it |
|---|---|
| Studio | Crop, smart crop, export sizes, image output (format, quality, size), saving, and video defaults. Changes apply to the open file. |
| Drop Zone | What happens to files you drop on the Drop Zone. See The Drop Zone. |
| Capture | Shortcuts, screenshot and recording options. See Screenshots. |
| App | Theme, license, destination folder, launch at login, watch folder and updates. See Preferences. |
Click a section's heading to fold it away. Cropped remembers which sections you folded.
Optimize and save
The buttons at the bottom right run the export.
| Button | What it does |
|---|---|
| Optimize (3) | Optimizes every file in the queue. Press ⌘ Command + ↩ Return (Windows: Ctrl + Enter). It reads Optimize & Save when videos are queued, auto-save is on, or export sizes are selected. |
| Optimize Active | Optimizes only the open file. With a single video it reads Optimize & Save Video. |
| Cancel remaining | Stops a running batch. |
| Save Results | Saves optimized files that aren't on disk yet (⌘ Command + S, Windows Ctrl + S). |
Files go to Downloads/Cropped unless you choose another folder in Preferences › Studio › Saving. When everything is saved, click Show in Finder to see them.
Savings counter
After your first export, the title bar shows how much space you've saved this month, with a level that climbs from Starter through Kilobyte Kid to Tera Tamer. Hover it to see your total, your day streak and the badges you've earned: First Trim, Email Ready, Clean Cut, Format Explorer, 90% Club, Lean Week, Fifty Files and First Gigabyte.
Ask for help
Click the ? button at the bottom left of the Studio to ask a question. Cropped answers from this guide without leaving the app.
Still stuck? Click the ? button at the bottom left of the Cropped Studio to ask, send us a message, or request a feature.