 Cropped
Help
Cropped
Help
Help / Crop, optimize & export
Combine videos, add music and a voiceover
Turn the video you have open into a short edit: add more videos and images, split and reorder clips, put music underneath and talk over it. Everything stays on your computer, and the originals are never changed.
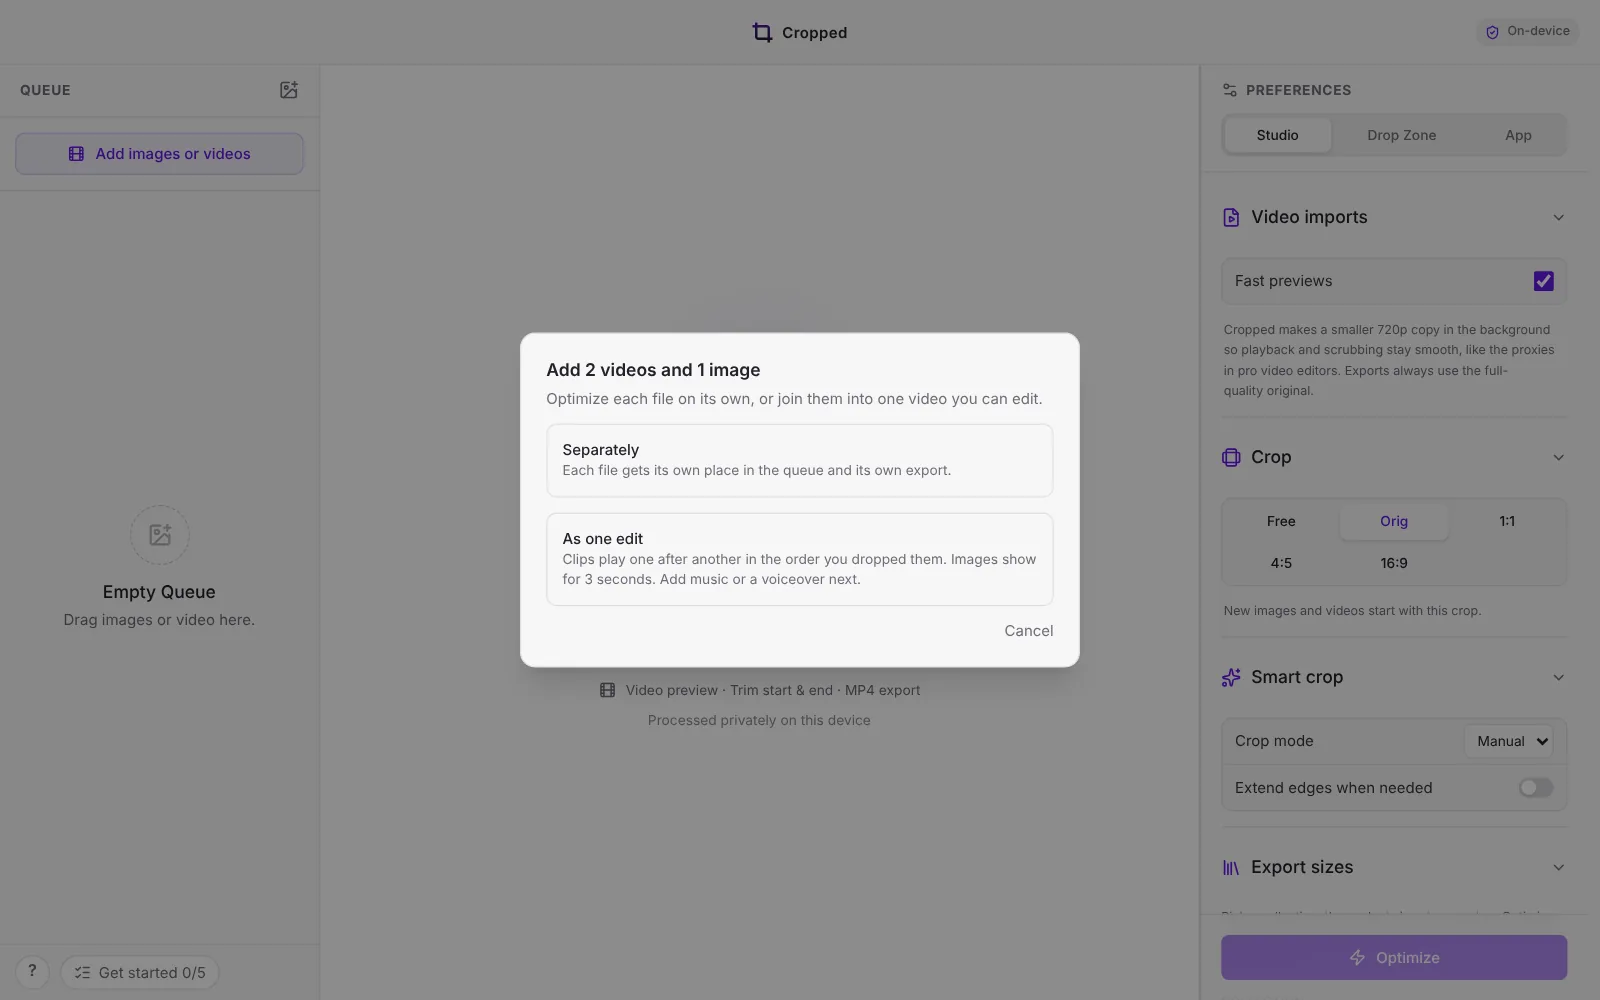
Start a sequence
There are two ways in:
- Drop several files at once. Drop two or more videos (and images, if you like) on the Studio and Cropped asks how to add them. Separately opens each one on its own. As one edit puts them on one timeline in the order you dropped them.
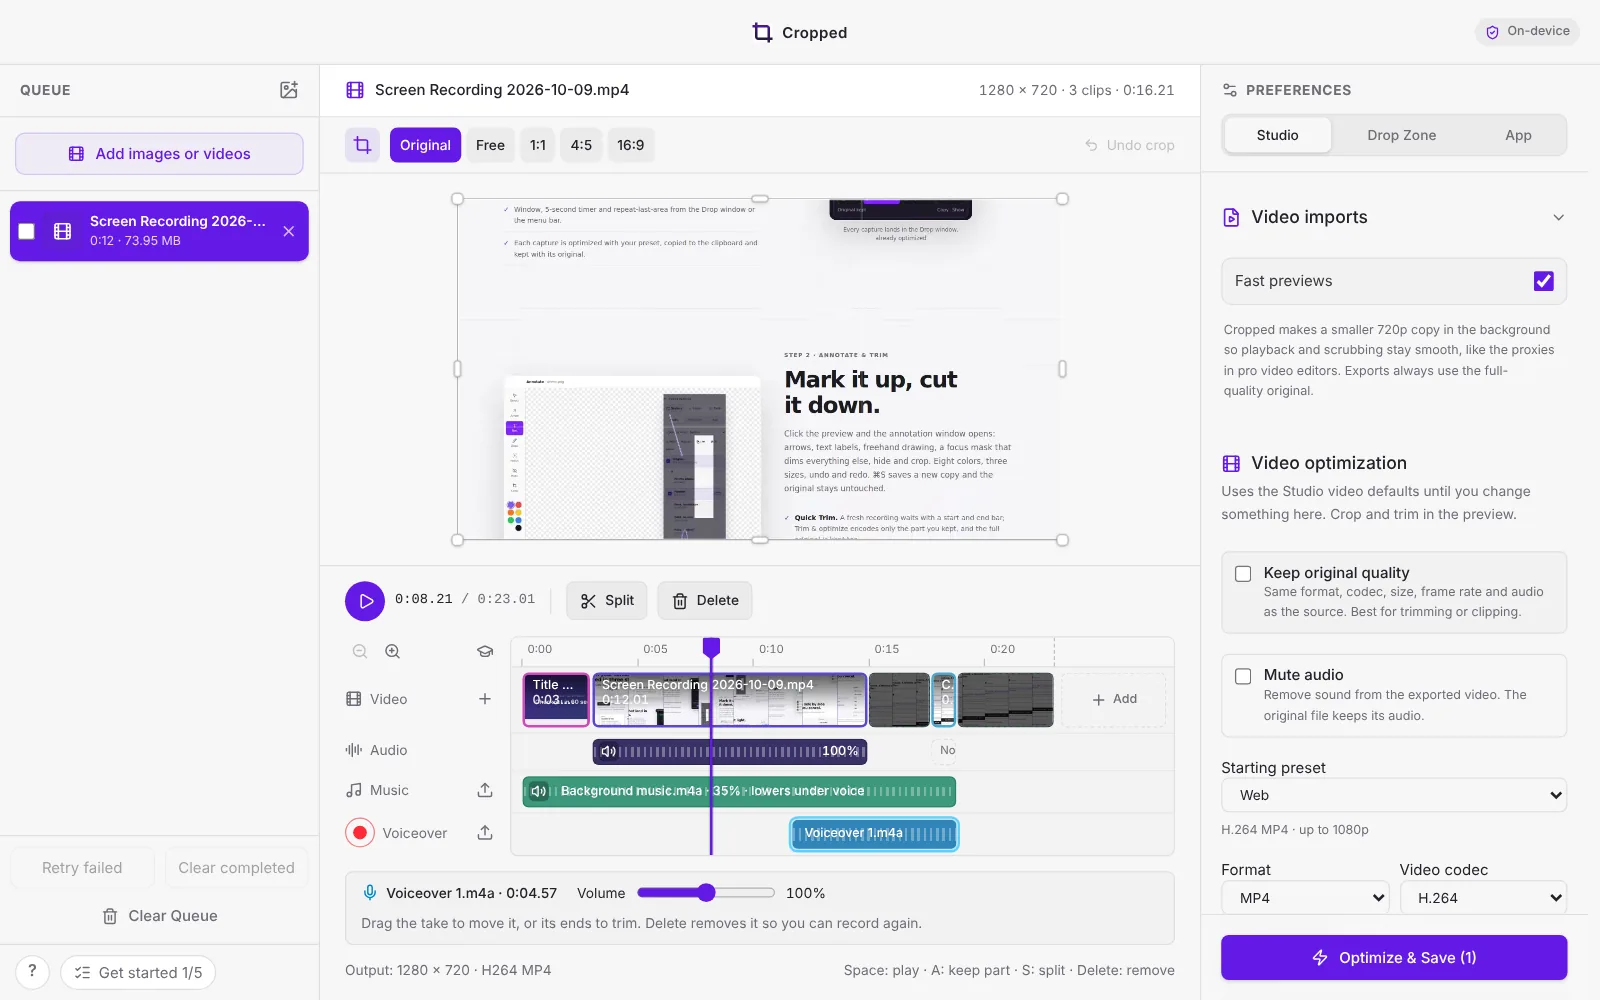
- Build on the video you have open. Every video already opens on this timeline. Click + on the Video lane, click the empty Music lane, or press the red record button, and the video becomes a sequence. Clips you already kept become the first clips.
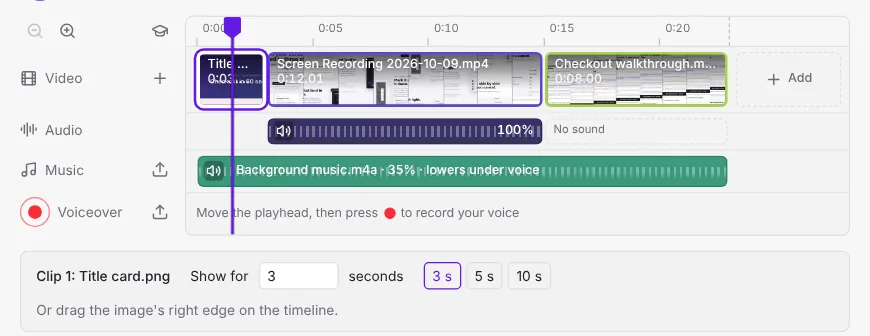
The timeline
The timeline has four lanes, with their buttons on the left:
| Lane | What it holds | Buttons |
|---|---|---|
| Video | Every clip, in the order it plays | + adds videos or images |
| Audio | The sound of each video clip, lined up under it | |
| Music | One song under the whole video | Upload adds or replaces music |
| Voiceover | Your recorded takes | Red record button, and upload for a voiceover file |
A video whose clips stay in order shows the rest of its footage dimmed around them, like a single video does. Hover a dimmed part, or a video you haven't cut yet, and click + (or press A) to keep a few seconds of it. Playback and the export skip the dimmed parts.
The purple playhead runs through every lane. Drag its handle, or click or drag anywhere on the ruler or on empty lane space, to scrub. The preview shows the frame under the purple line.
Zoom in to work on short clips with the − and + buttons above the lanes, or hold ⌘ Command (Ctrl on Windows and Linux) and scroll. The timeline scrolls sideways and follows the playhead while it plays.
Arrange clips
- Add: click + on the Video lane, or the Add space at the end of the timeline. Pick one file or several at once. New clips go after the selected clip, or at the end. You can also drop files straight onto the timeline.
- Images: show for 3 seconds. To show one longer, select it and click 3 s, 5 s or 10 s, type any length in Show for, or drag its right edge on the timeline.
- Split: move the playhead and click Split or press S. The clip under the playhead becomes two.
- Reorder: drag a clip left or right. A line shows where it will land.
- Keep part of a video: hover it and click +, then drag the new clip's ends.
- Trim: drag either edge of a clip.
- Delete: hover a clip and click its ×, or select it and click Delete or press Delete.
Videos of different sizes are fitted inside the first video's frame with black bars. The crop ratios above the preview crop the whole sequence.
Clip sound
The Audio lane shows each video's own sound under its clip, so you can set each one separately:
- Click the speaker on a clip's sound to mute or unmute it.
- Drag a clip's sound up or down to make it louder or quieter, from silent to 200%. The percentage shows on the clip.
- Select a clip to see its details under the timeline: From and to set exactly which part of the video it plays, Mute clip silences it, and Clip volume sets an exact level.
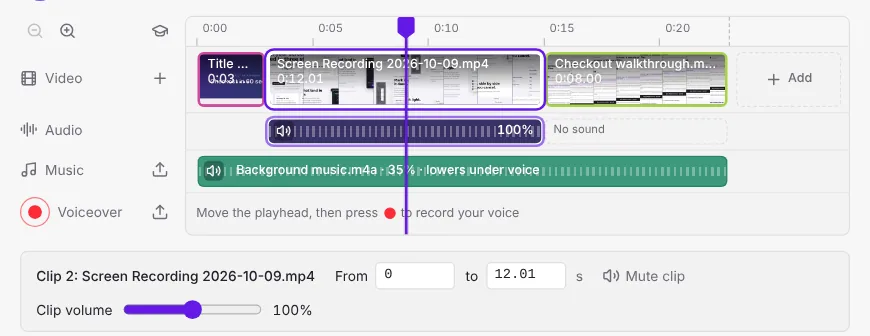
Clips with no sound, and images, show No sound. Muting a clip only affects the saved video; the original file keeps its sound.
Add music
Click the empty Music lane, or the upload button next to it, and pick an M4A, MP3, WAV, AAC, AIFF, FLAC, OGG or Opus file. It plays under the whole sequence. Click its speaker to mute it, or drag it up or down to change the volume. Select it to change:
| Setting | What it does |
|---|---|
| Volume | How loud the music is. It starts at 35%. |
| Fade in and out | Fades the start and end, from off to 5 seconds. |
| Lower while someone talks | Dips the music by about 7 dB whenever a clip or voiceover has sound, and brings it back up after. The music stays clearly audible, even under a recording that talks the whole way through. Turn it off to keep the music at one level. |
| Repeat to the end | Loops a short song until the sequence ends. |
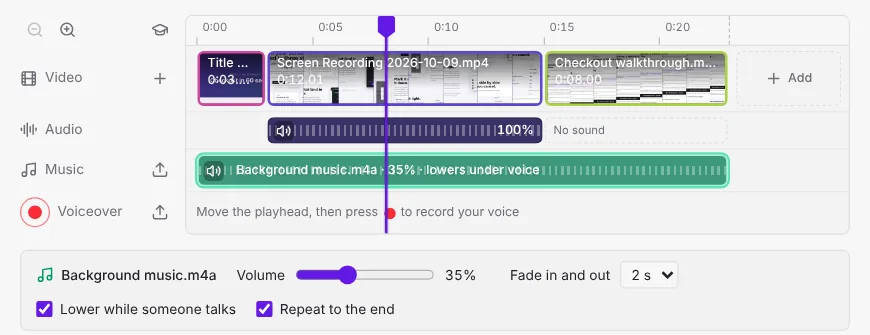
Replace music swaps the song. Select the Music lane and press Delete to remove it. Use music you have the rights to.
Record a voiceover
- Move the playhead to where you want to start talking.
- Click the red record button at the left of the Voiceover lane. The first time, allow Cropped to use the microphone.
- Talk while the sequence plays. Clip sound is muted while you record so it doesn't echo.
- Click the button again to stop. The take appears on the Voiceover lane.
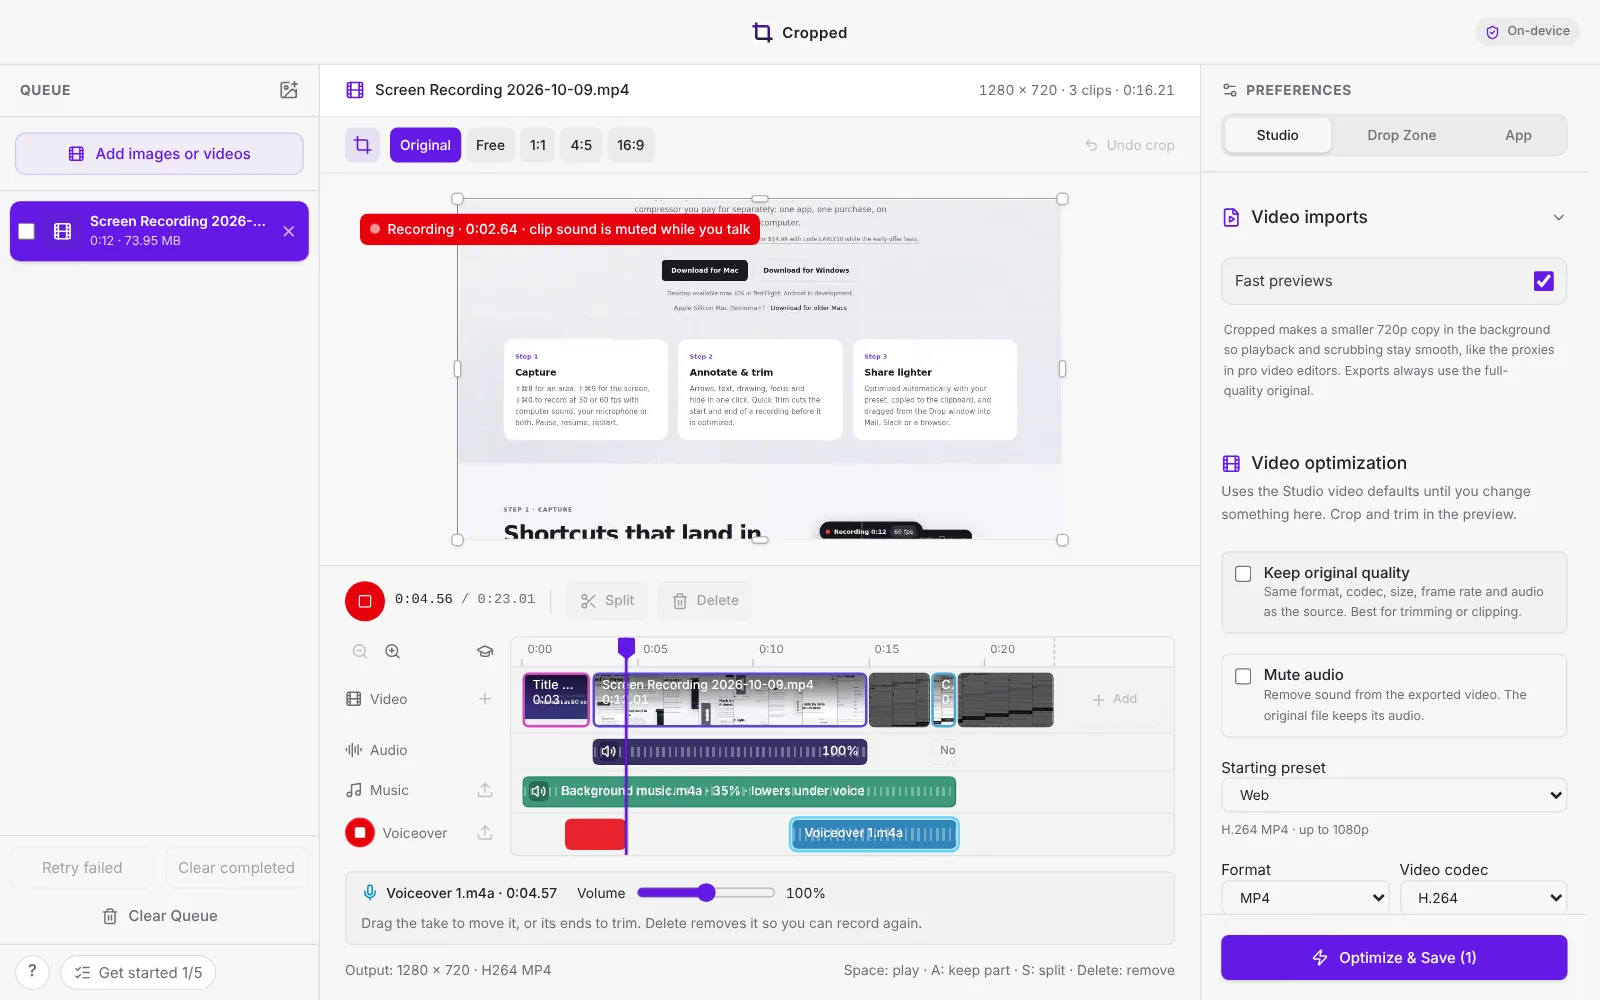
Drag a take to move it, or drag its ends to trim it. Select a take to set its volume, or press Delete to remove it and record again. You can record as many takes as you like.
If you stop early or the recording has no length saved in it (some microphones and systems don't write one), Cropped uses the time you spent recording, so the take is never lost.
Already recorded somewhere else? The upload button on the Voiceover lane adds an audio file at the playhead. If your computer won't let Cropped use the microphone, check System Settings › Privacy & Security › Microphone on Mac, or add a file instead.
Smooth playback
Big videos, such as 4K, HDR, high frame rate or ProRes recordings, can stutter while you edit. Cropped makes a smaller copy of each one in the background for the preview, like the proxies in pro video editors, and switches to it when it's ready. Your export always uses the original files. A Fast preview badge shows on the preview while it's in use. To always play the originals, turn off Fast previews in Preferences › Studio › Video imports. See Fast previews.
Keys
| Key | Action |
|---|---|
| Space or K | Play or pause the sequence |
| A or + | Keep the part under the playhead |
| S | Split the clip at the playhead |
| Delete | Remove the selected clip, music or take |
| ← Left arrow → Right arrow | Back or forward one frame (Shift: one second) |
| Home / End | Jump to the start or end |
| ⌘ Command or Ctrl + scroll | Zoom the timeline in or out |
Export
Choose your settings under Video optimization and click Optimize & Save, the same as for one video (see Video formats and presets). Cropped joins the clips, mixes the music and voiceover, then encodes one video. Exporting a sequence takes a little longer than a single video because of the join step, and the progress bar covers both.
The saved video is exactly what the timeline plays:
- Only the clips on the Video lane, in their order, with their trims. Dimmed parts are left out.
- Images for as long as you set.
- Each clip's sound at its own volume, or silent if you muted it.
- The music under the whole video, faded, repeated and lowered under speech the way you set it.
- Every voiceover take where it sits on the timeline, at its volume.
Videos of a different size or shape are fitted inside the first video's frame, and the crop above the preview applies to the whole sequence. Your original files are never changed.
If something's missing from the saved video
- No sound at all: check that Mute audio is off under Video optimization. It removes the whole soundtrack, music and voiceover included.
- No music or voiceover: make sure the music isn't muted (the speaker on the Music lane) and that the music's or the take's volume isn't at 0%.
- A clip is silent: check its speaker on the Audio lane and its Clip volume.
- Can't record: allow the microphone in System Settings › Privacy & Security › Microphone on Mac, or add a recorded file with the upload button on the Voiceover lane.
Still stuck? Click the ? button at the bottom left of the Cropped Studio to ask, send us a message, or request a feature.