 Cropped
Help
Cropped
Help
Help / Capture & annotate
Record a how-to
The short answer: click How-to in the Drop Zone, pick a window or an area, and click through the task while you say what you're doing. When you stop, the recording opens in the Studio already set up: it zooms in on each click, a numbered badge shows each step, and your words become captions. Export it as a guide (one picture per step, with the step's words) or as a video.
It's the same recording, zoom, caption and guide tools Cropped already has, behind one button. Nothing leaves your computer.
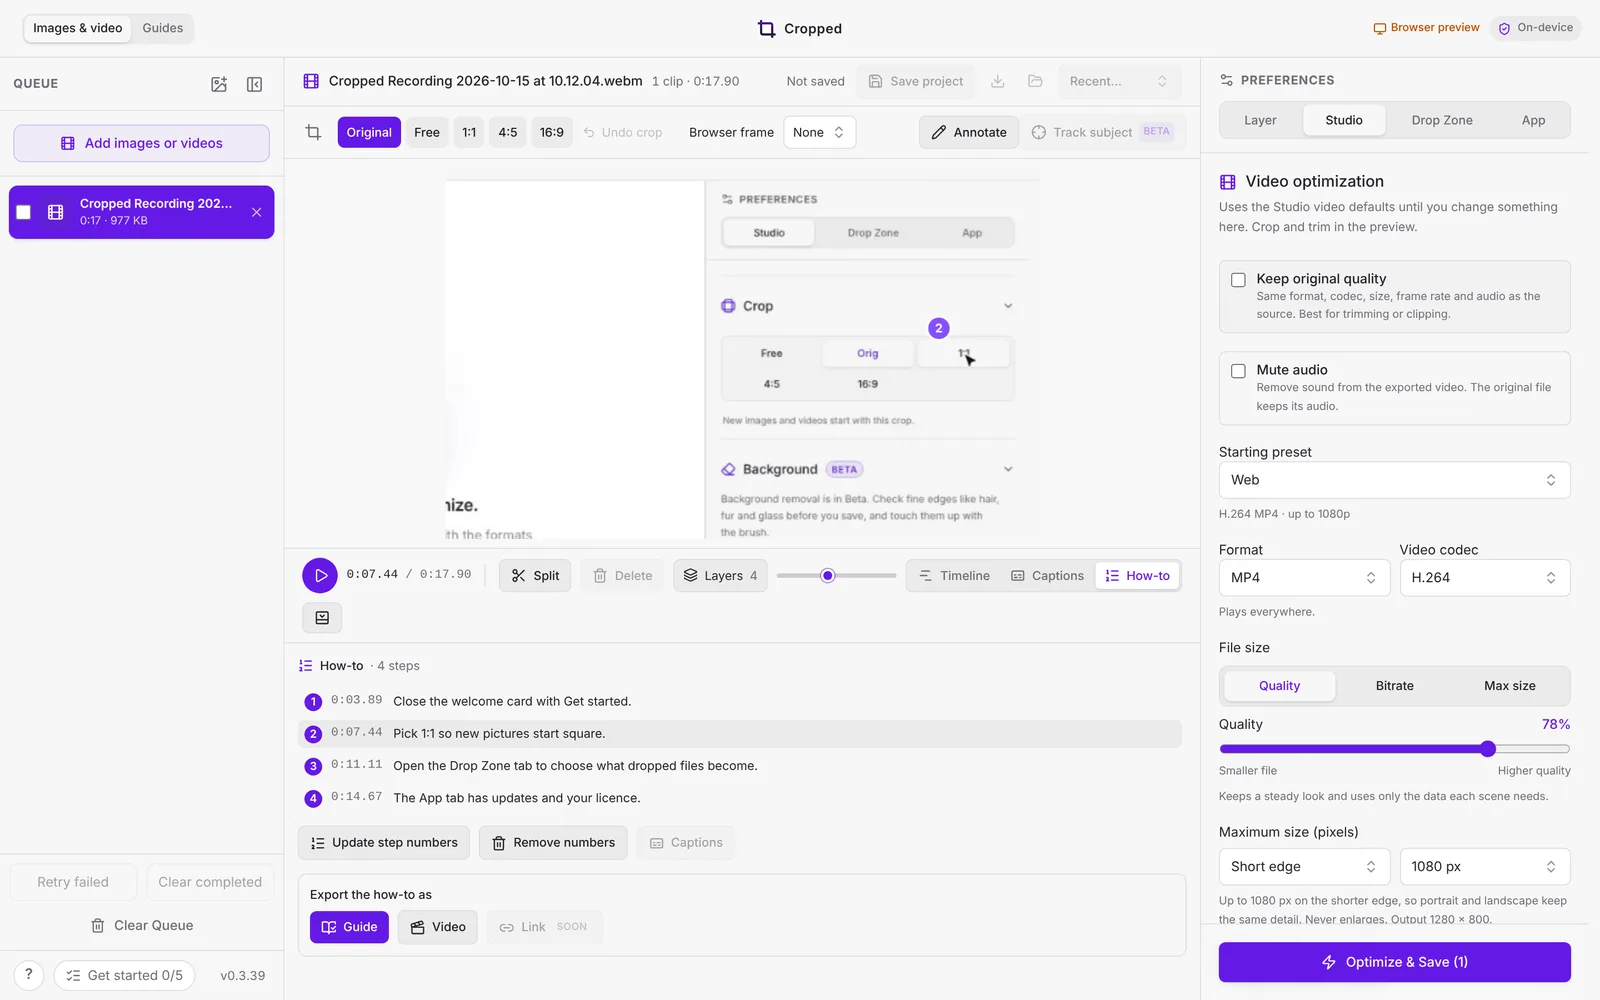
These pictures are from Cropped's browser preview, showing a real recording of Cropped itself. Record a how-to works the same in Cropped for Mac, Windows and Linux Beta.
Record it
- Start a how-to in any of these places:
- How-to next to Record in the Drop Zone's capture buttons.
- Record a how-to in Guides, when a guide has no steps yet.
- Record another in the How-to tab of a video in the Studio.
- Pick a window, or drag an area, the same way as a screen recording. Turn on the microphone in the recording bar if you want captions.
- Click through the task at a normal pace. Say what each click does as you go: "Open Settings, then choose Export."
- Click Stop in the recording bar, or press the record keys again (⇧ Shift + ⌘ Command + 0 on Mac, Ctrl + Shift + 0 on Windows).
A how-to take isn't optimized straight away like other recordings. It opens in the Studio instead, with the How-to tab showing.
Keep a picked window still while you record. Clicks are measured against where the window was when the recording started. If you need to move things around, record an area or the whole screen instead.
What the Studio sets up
- A zoom on every click. These are ordinary zooms on clicks: drag, resize or remove any of them on the Zoom lane, or press Z to add one.
- A numbered badge for every step. The badge appears just up and to the left of the click as it lands, so it never covers what you clicked. It stays until the next step. A double-click counts as one step.
- Captions from what you said. If the take has sound and a speech model is already on this computer, captions start on their own. Otherwise, click Captions in the How-to tab and then Make captions (the first time downloads a speech model). See Add captions to a video.
The badges are ordinary annotation layers in your default annotation style. Click one on the preview to move it or change its look, or use Annotate to add your own arrows and notes.
| In the How-to tab | What it does |
|---|---|
| A step in the list | Jumps the preview to that click |
| Add step numbers / Update step numbers | Puts a badge on every step again, for example after you trim the video. Your own annotations stay |
| Remove numbers | Takes the step badges off and keeps everything else |
| Captions | Opens Captions to make or edit them |
Trimming works as usual. Clicks in parts you leave out aren't steps, and the steps renumber themselves.
Export as a guide
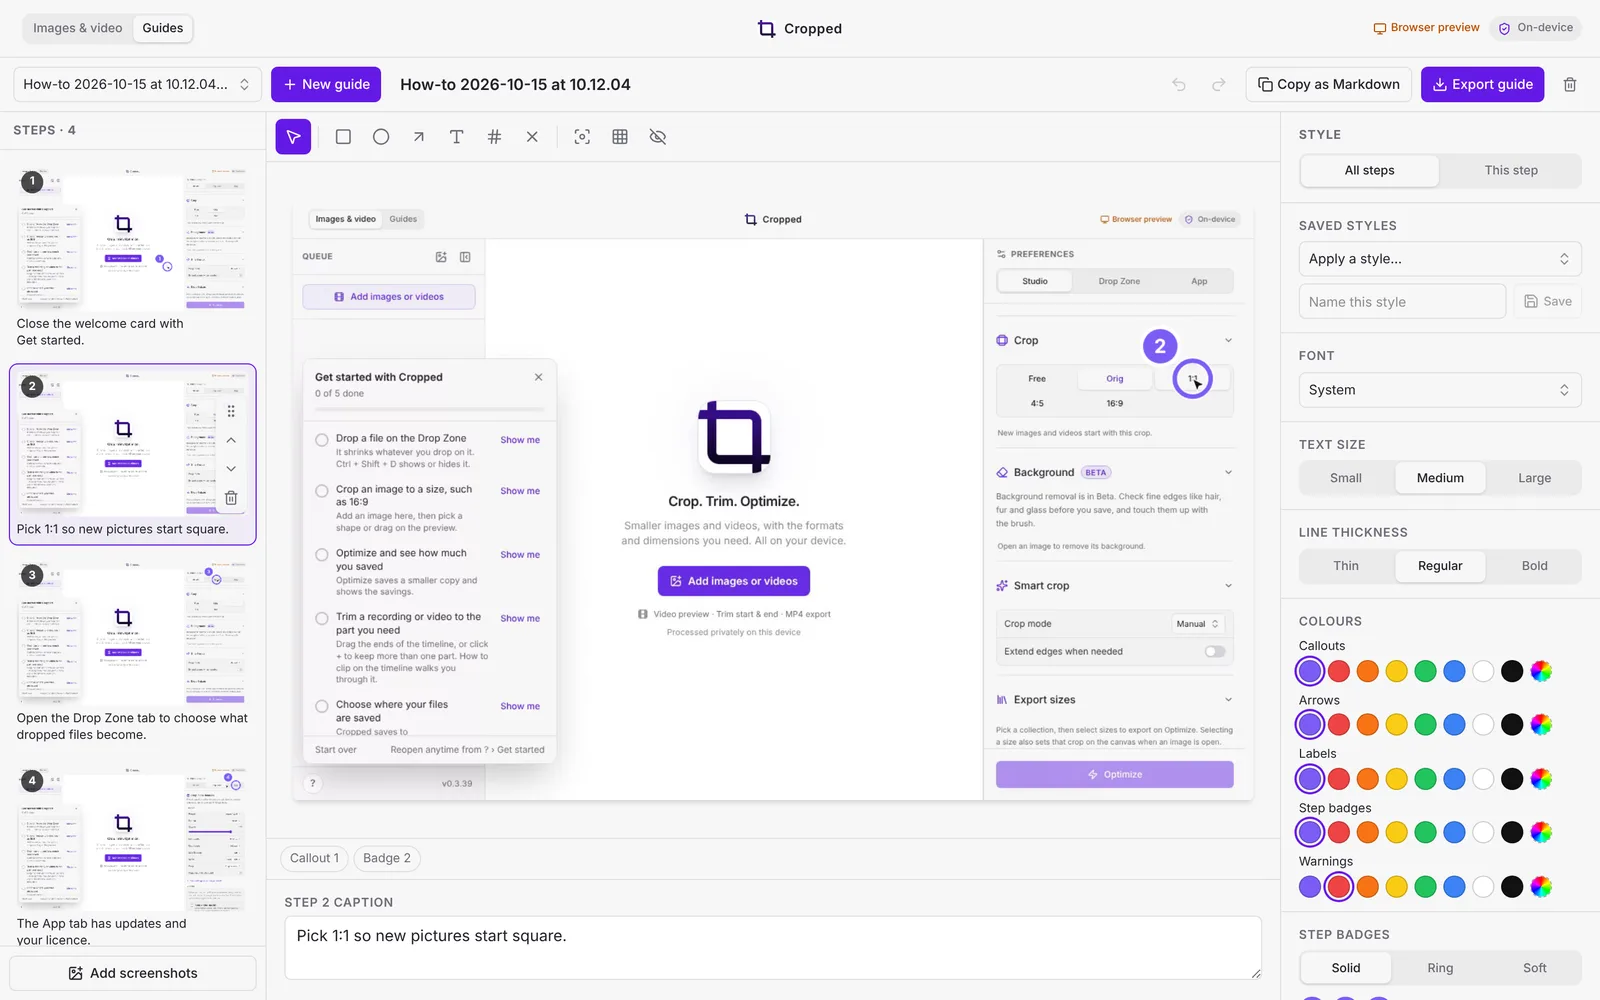
Click Guide under Export the how-to as. Cropped makes a new guide with one step per click:
- The picture is the full-size frame from just before the click, so it shows what's about to be clicked.
- A ring marks the spot that was clicked, with the step number beside it.
- The step's text is what you said around that click. With no captions, it reads "Step 1", "Step 2" and so on.
When it's done, click Open in Guides. Each step is an ordinary guide step, so you can fix the words, move the ring, crop, and restyle every step at once. Then use Export guide for pictures with a Markdown file, or Copy as Markdown. See Guides.
Export as a video
Click Video under Export the how-to as. It takes you to the export settings. Click Optimize & Save, and the zooms, step badges and captions are rendered into the saved video, so it plays the same everywhere.
Share as a link
Link is coming soon. Until then, export a guide or a video and share the file.
Mac, Windows and Linux
| Mac | Windows | Linux Beta | |
|---|---|---|---|
| Steps from an area or the whole screen | Yes | Yes | The whole screen, on X11 desktops |
| Steps from a picked window | Yes, as long as the window stays where it was | Yes | No. Record the whole screen instead |
| Captions from your microphone | Yes (macOS 15 or later) | Yes | Yes |
Wayland desktops don't let apps see clicks in other apps, so a how-to recorded there has no steps. You can still add zooms with Z, and add numbered badges with Annotate.
Troubleshooting
- The How-to tab says there are no recorded clicks. The video wasn't made with Cropped, or it was recorded on Wayland. Record it again with Record a how-to.
- The badges are in the wrong place. The window probably moved during the recording. Drag the badges into place, or record an area instead.
- Captions didn't start on their own. They only start by themselves when a speech model is already downloaded. Click Captions, then Make captions.
Still stuck? Click the ? button at the bottom left of the Cropped Studio to ask, send us a message, or request a feature.