 Cropped
Help
Help / Crop, optimize & export
Camera looks: your camera beside the screen
Updated
When you record with the camera on, Cropped keeps the camera as its own track beside the screen. In the Studio you can move it, frame it on your face, and switch between looks while the video plays. The camera and the screen always stay in sync, through trims, cuts and speed changes.
Recording the camera as its own track works on a Mac. On Windows and Linux there is no camera track yet, but Styles works on any video.
Two buttons in the tool column left of the preview cover this page. Camera shows only when the recording has a camera, and holds the camera's own settings. Styles is there for every video, and frames the whole video with a kit, a background, room around the screen, corners and a shadow.
Move and size the camera
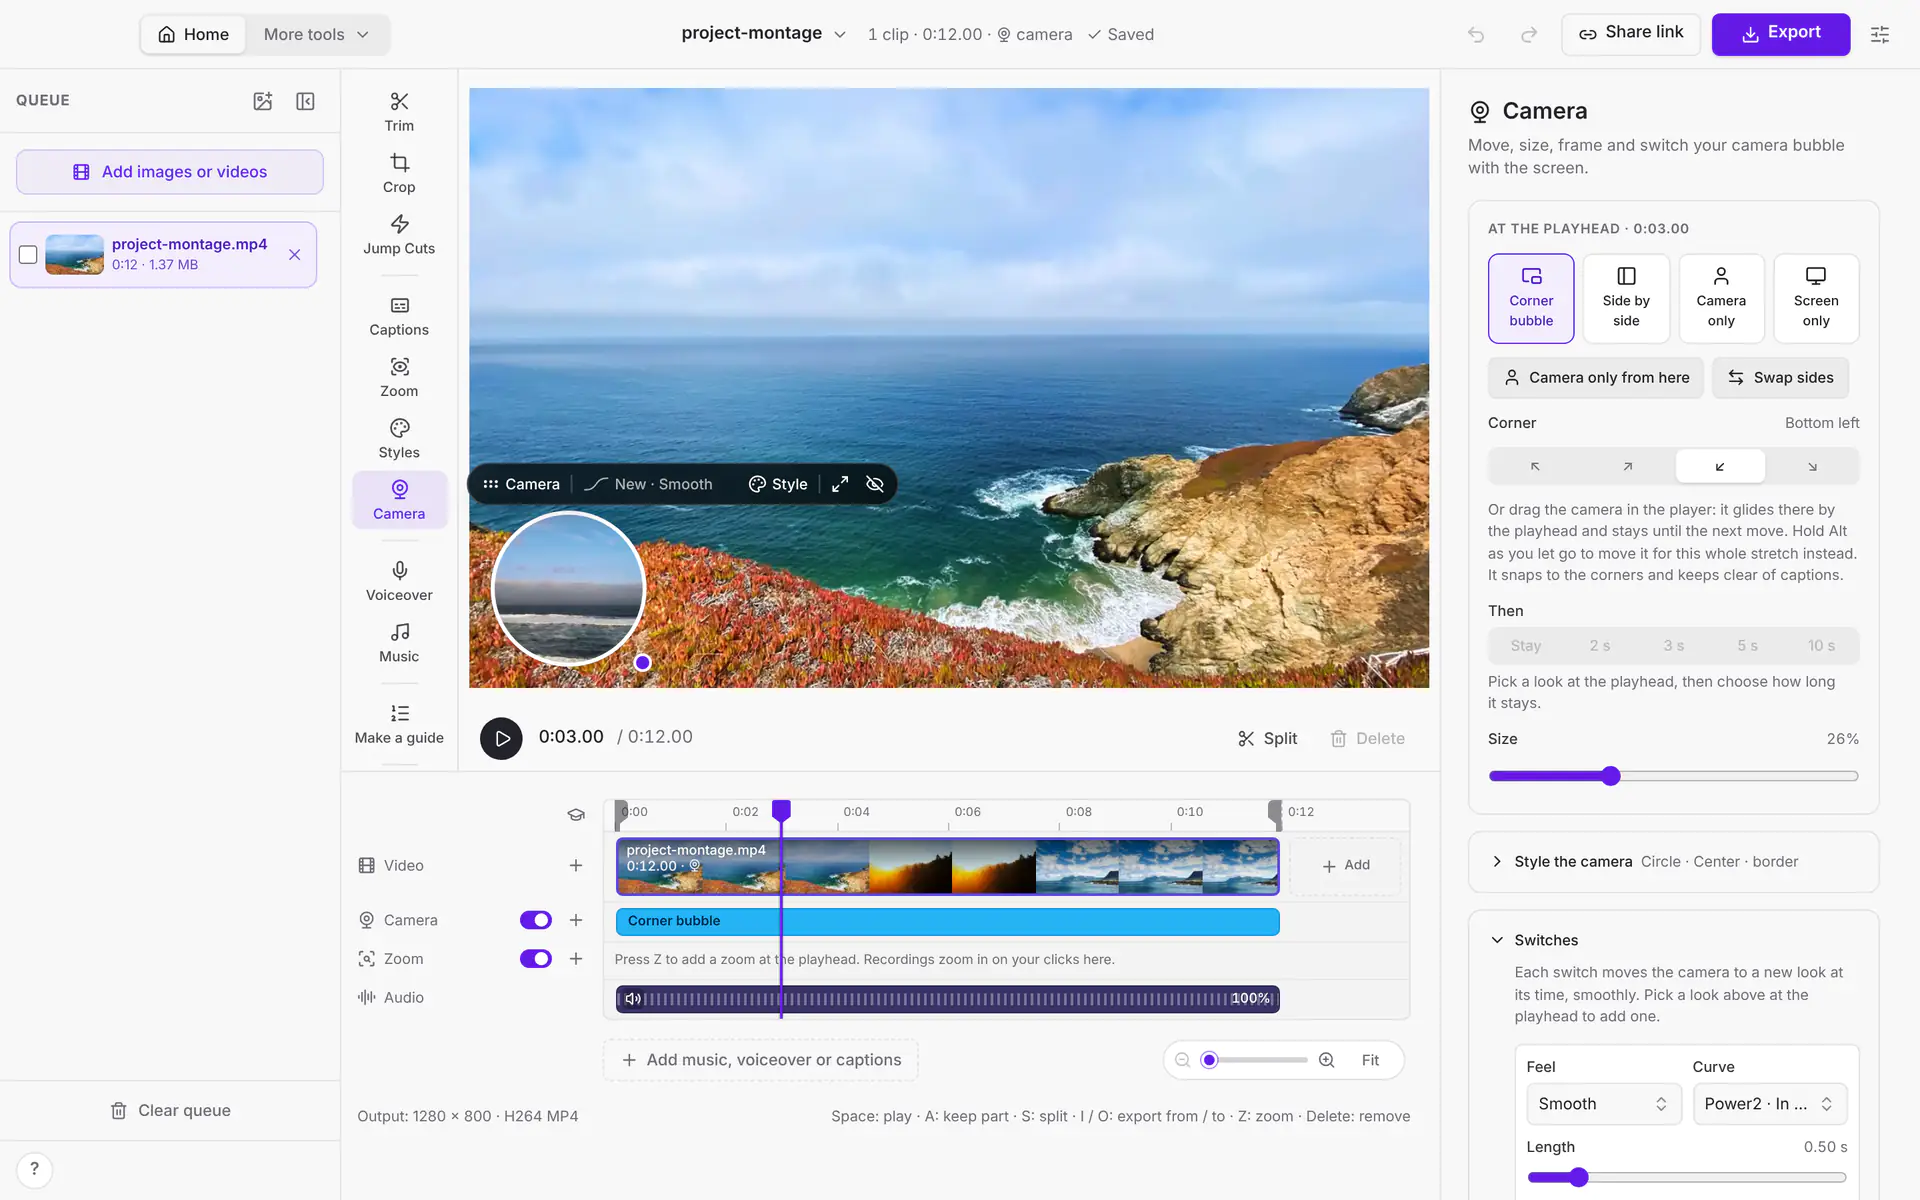
The camera starts as a round bubble in the bottom left corner.
- Drag the bubble, or the Camera handle above it, to move it. Let go near a corner and it snaps into place. It moves whatever else is open, and grabbing it while the video plays pauses it.
- Drag the small dot on its bottom right corner to make it bigger or smaller.
- Or pick a corner and a size in the Camera panel.
- Click the bubble to open the Camera panel.
Move it at any point in the video
Where the playhead is, that's where the move happens. Drag or resize the bubble at 0:12, and the camera glides there with your switch feel, arrives at 0:12, and stays until the next move. What you see when you let go is exactly what plays. A move is a purple diamond on the Camera lane, named Move: drag the diamond to change when it happens, or remove it to undo the move.
- With the playhead at the very start, a drag sets where the camera starts.
- With the playhead on a move, a drag changes that move instead of adding another.
- Hold ⌥ Option (Alt on Windows and Linux) as you let go to move the camera for the whole stretch the playhead is in, with no new move.
Edit the camera right on the video
Pause, and a bar sits just above the camera bubble:
- Camera: drag it to move the bubble, or click it to open the Camera settings.
- The move into here (for example Smooth · 0.5 s): click it to pick how the move feels (Smooth, Gentle, Snappy, Brisk, Springy, Bouncy, Steady, or Cut with no movement), set its length, choose whether it stays or goes back after a few seconds, or remove the move. Changing the length keeps the camera arriving where the playhead is. With no move here, it sets how new moves glide.
- Style: the bubble's shape, framing and border color, from the playhead on (it glides into the new style) or for this stretch only.
- Camera only and Hide: switch to the camera filling the video, or to the screen only, arriving at the playhead.
With the playhead on a move, a dashed outline shows where the move starts and a dotted line shows the path to where it lands. Click Play in the move's settings to watch just that move: it plays from a moment before and stops where the move lands.
Other ways to edit on the video:
- Snap and line up: while you drag, the bubble's middle snaps to the middle and the thirds of the video, shown by thin lines. Hold ⇧ Shift to keep it on a straight line across or down, or ⌘ Command (Ctrl on Windows and Linux) to drag without snapping.
- Drag the bubble to the left or right edge to switch to side by side, with the camera on that side.
- Drag the camera beside the screen back into the picture to make it a bubble again, right where you let go.
- Pull the size knob well past the largest size, or double-click the bubble, for camera only.
- In camera only or screen only, a button at the top of the video takes you back.
- Keys: click the bubble, then use the arrow keys to nudge it (hold ⇧ Shift for bigger steps), + and − to resize it, and Delete to remove the move at the playhead.
On the Camera lane, each move shows how it feels and how long it takes. Click a move's diamond for the same settings, and drag the light edge at the end of a move's shading to make it longer or shorter.
Captions stay put
Captions burned into the video always sit in the same spot, at the top, middle or bottom you picked. The camera bubble keeps out of their way: with captions on, a bubble in a corner by the captions sits just above them (or below them, for captions at the top). While you drag the bubble, the room the captions keep shows as a dashed outline, and the bubble slides along its edge. Side by side and Camera only stay as they are, since captions over a full picture are normal. The export places the camera exactly as the preview does.
Switch looks
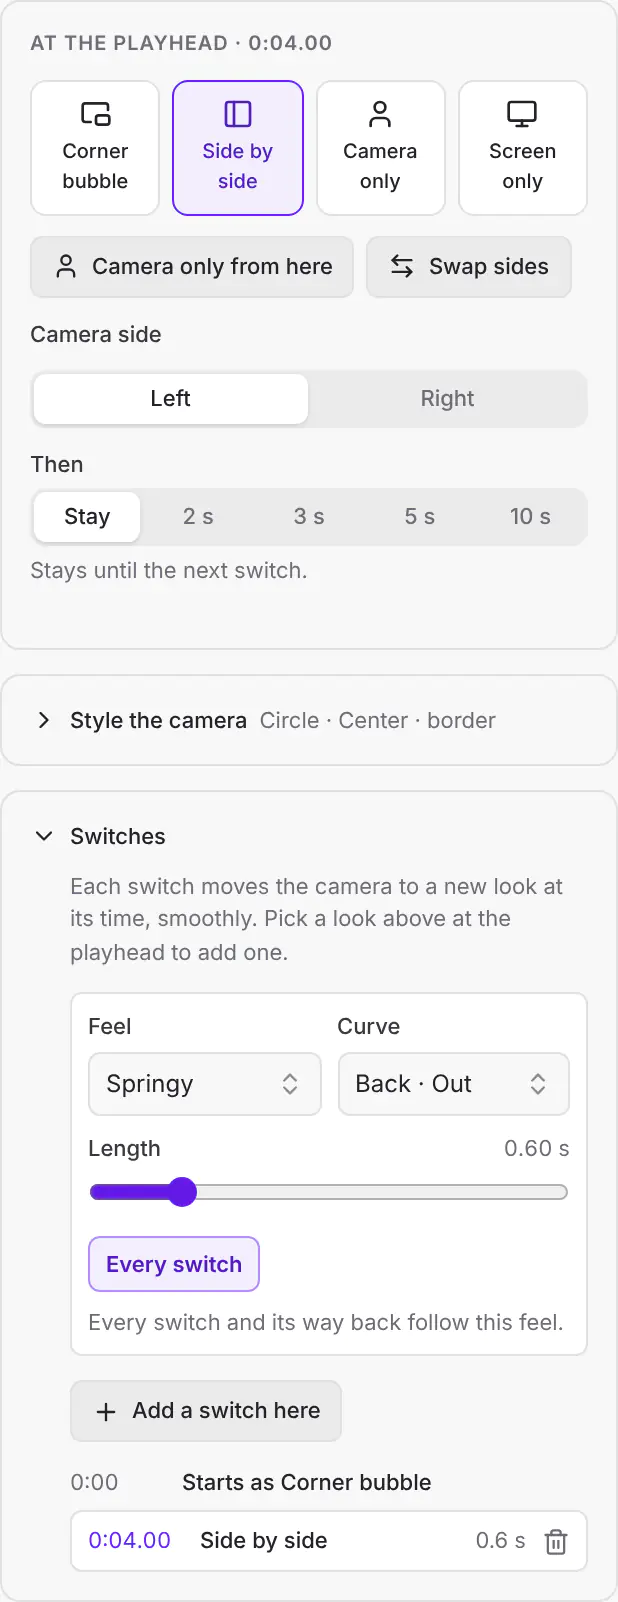
Click Camera in the tool column left of the preview (it shows only when the recording has a camera). Its settings open on the right, beside the preview. Move the playhead, then pick what shows from there on:
- Corner bubble: the full screen with your camera small in a corner.
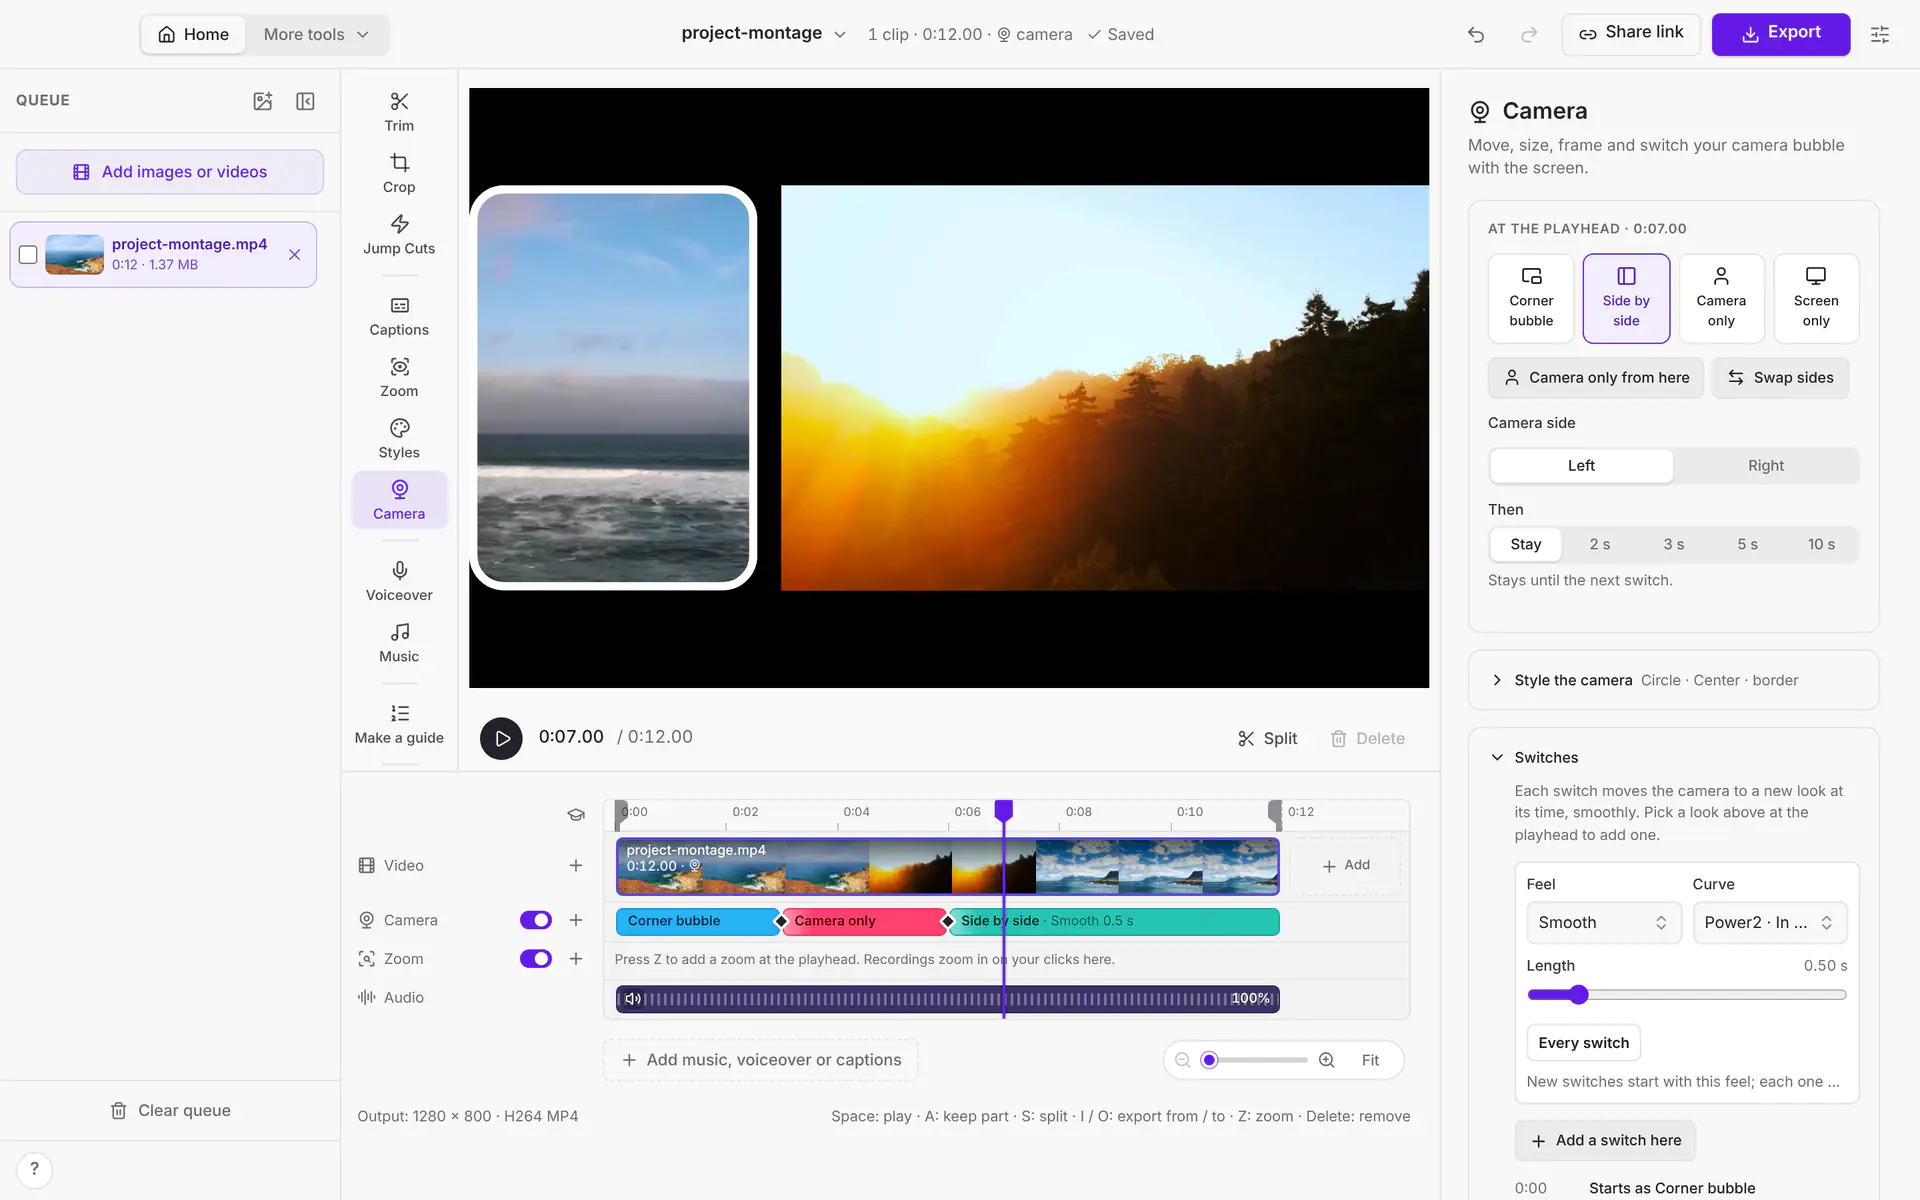
- Side by side: your camera beside the screen.
- Camera only: your camera fills the video. Click Back to the screen to switch back.
- Screen only: the camera is hidden.
Each pick at the playhead adds a switch. The camera moves smoothly into its new place. Swap sides moves the camera to the other side.
Go back by itself
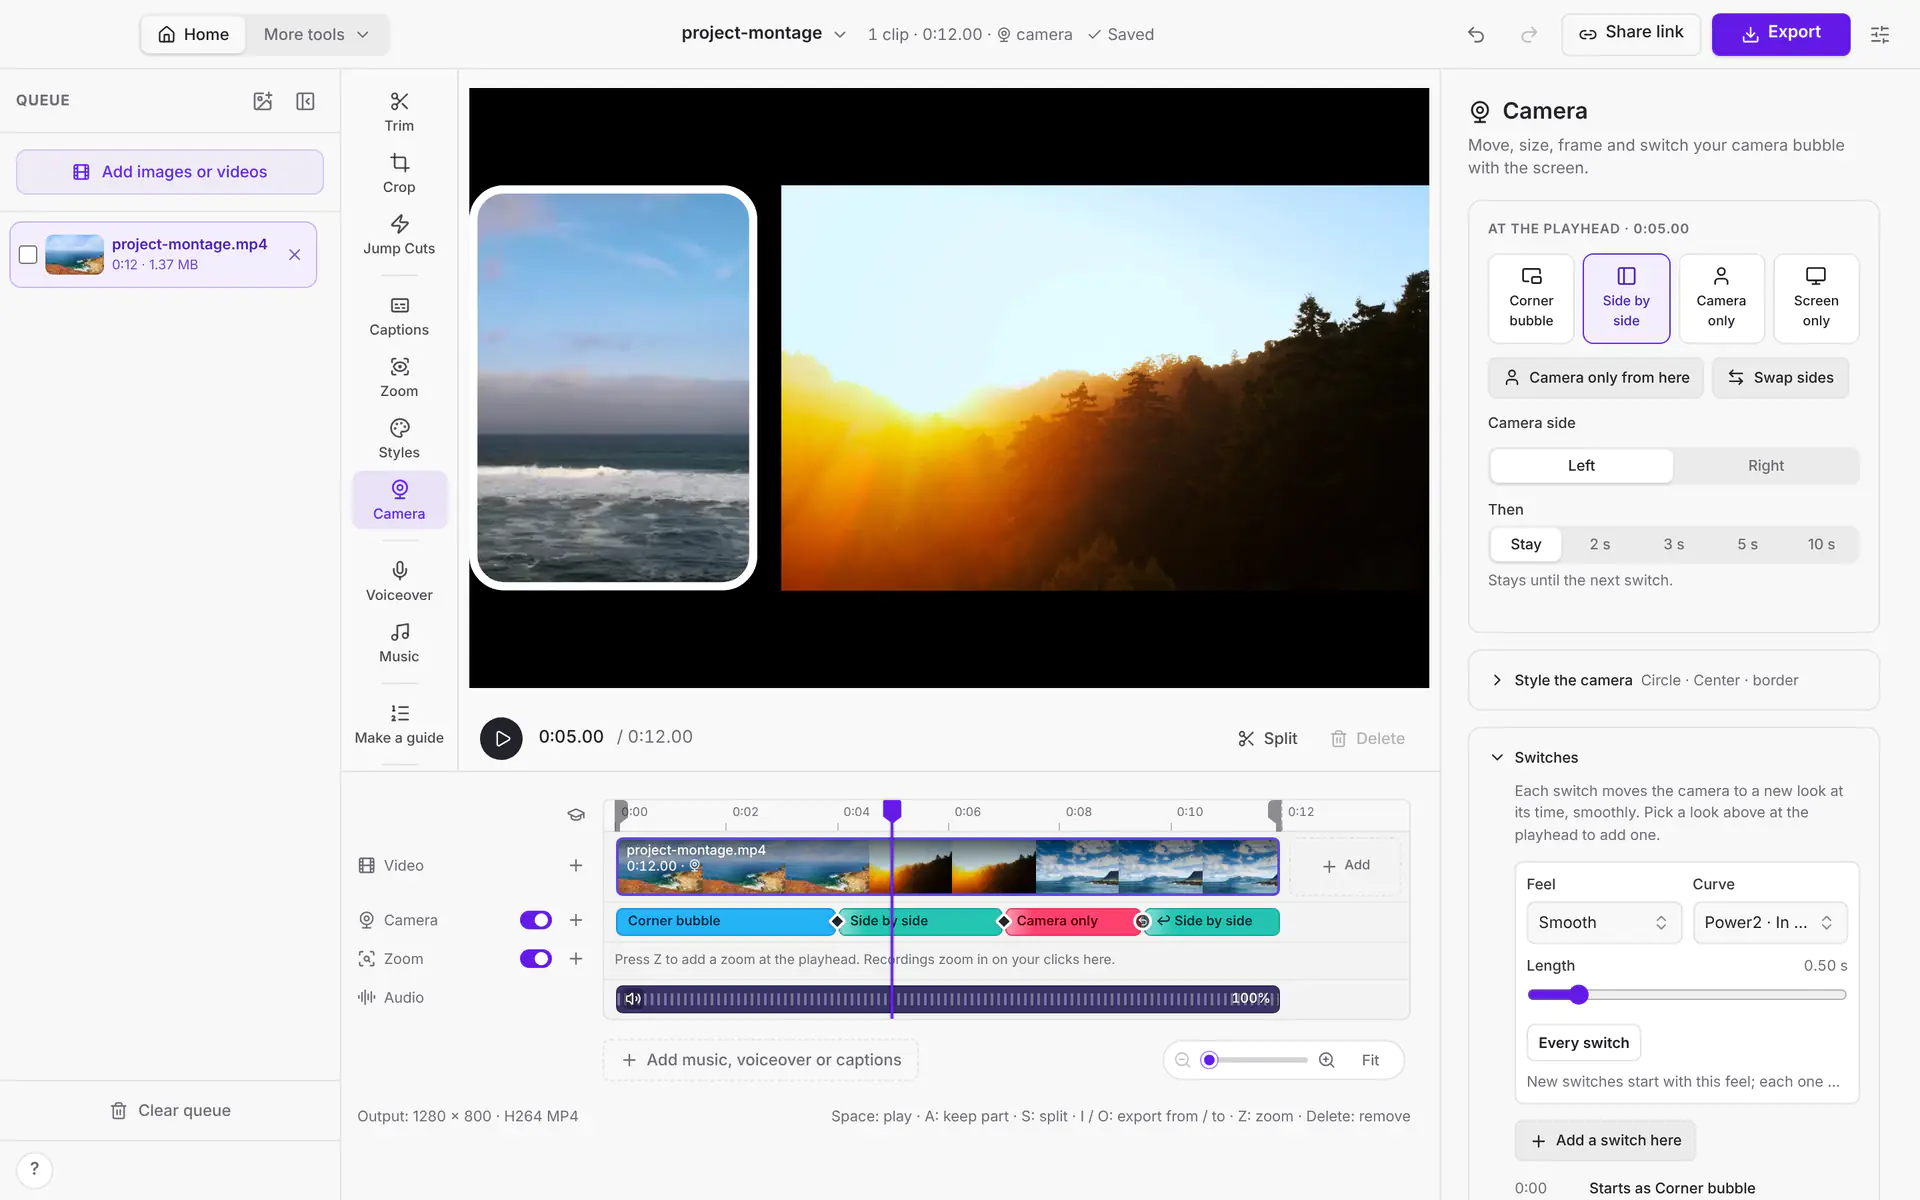
Under a look you picked, Then sets how long it stays: Stay keeps it until the next switch, or pick 2 s, 3 s, 5 s or 10 s and the camera goes back to the look before by itself. The way back takes as long as the way in, with the curve turned around, so it eases out the way it eased in. In Switches, a switch that goes back shows when, and you can type any length.
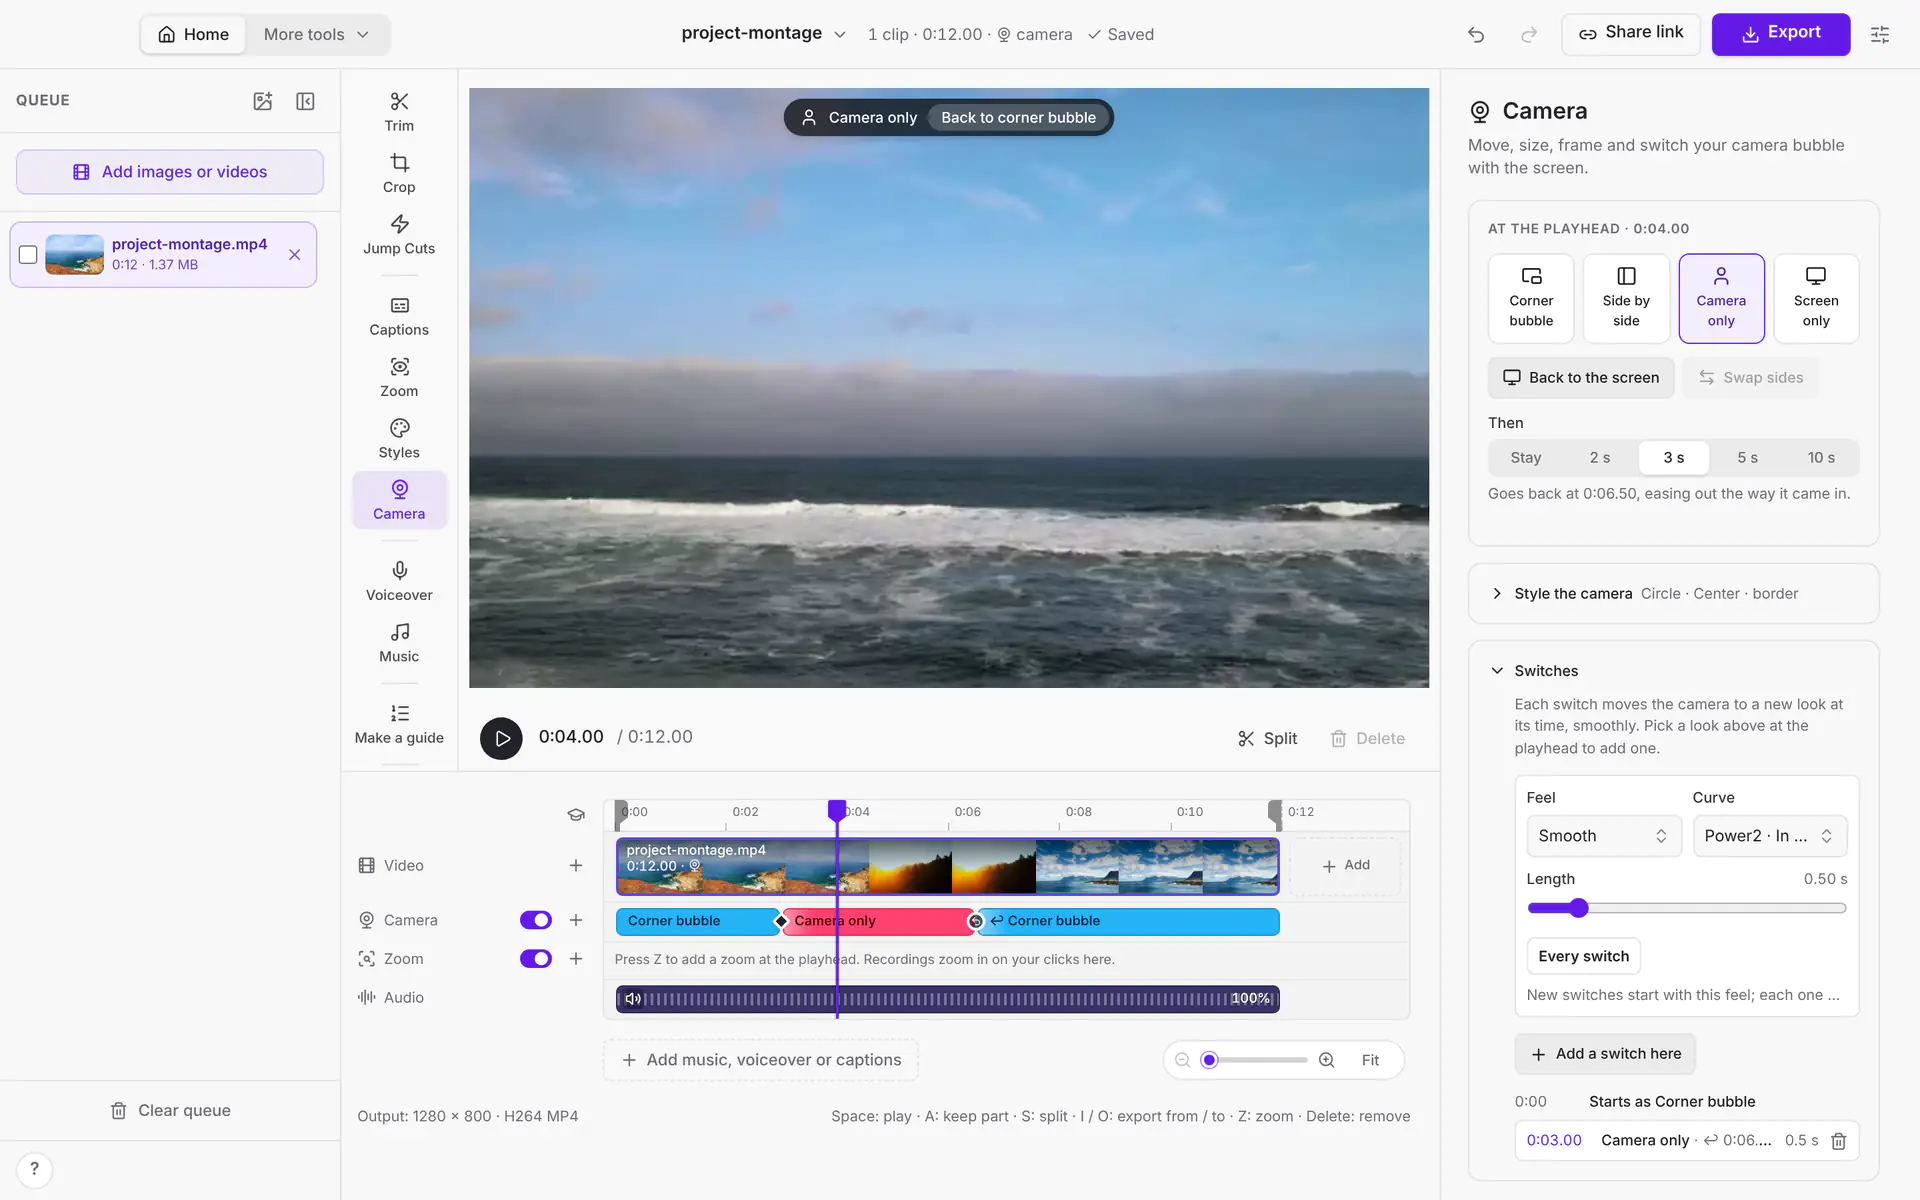
Open Switches to see every switch. Click a time to go there. Click a switch's length to type its exact start time, set its Length (how long the move takes) and Curve, or turn on Cut, no movement to jump straight to the new look.
How the moves feel
Feel, at the top of Switches, sets the curve and length of the moves together: Smooth, Gentle, Snappy, Brisk, Springy, Bouncy or Steady. Change the Curve or Length by hand and it becomes Custom. New switches start with the feel. Turn on Every switch and every switch, and every way back, follows it, now and as you change it; turn it off and each switch keeps its own curve and length again.
In the export, the camera moves in fractions of a pixel, so even the slow end of a move settles smoothly instead of stepping. The camera is one shape the whole way through. When it changes look, such as side by side becoming a corner bubble or a bubble becoming Camera only, its outline, corners, border and the picture inside change smoothly from one into the other. Nothing fades across, so you never see a double picture. Coming into view, the camera grows out of its corner; hiding, it shrinks back into it. Camera only fills the screen's place with no border, whatever border the bubble has.
The Camera lane on the timeline
The camera has its own lane on the timeline, under Video. Each stretch shows the look it has, in its own color, with the move into it shaded at its start.
- Drag a diamond to change when that switch happens; the video follows it. Click a diamond to set how its move feels and how long it takes. Drag a ↩ dot to change how long a look stays before it goes back.
- Click a stretch to go there and open the Camera tools.
- Click + to add a switch at the playhead, or hover over a stretch and click × to remove its switch.
- The switch next to Camera hides the camera in the whole video. Its switches stay on the lane for later.
- The lane only draws the camera over clips that were recorded with it. A clip recorded without the camera shows No camera, the header above the timeline says how many clips have one (for example "camera in 2 of 3 clips"), and the export leaves the camera out until those clips are removed.
Style the camera
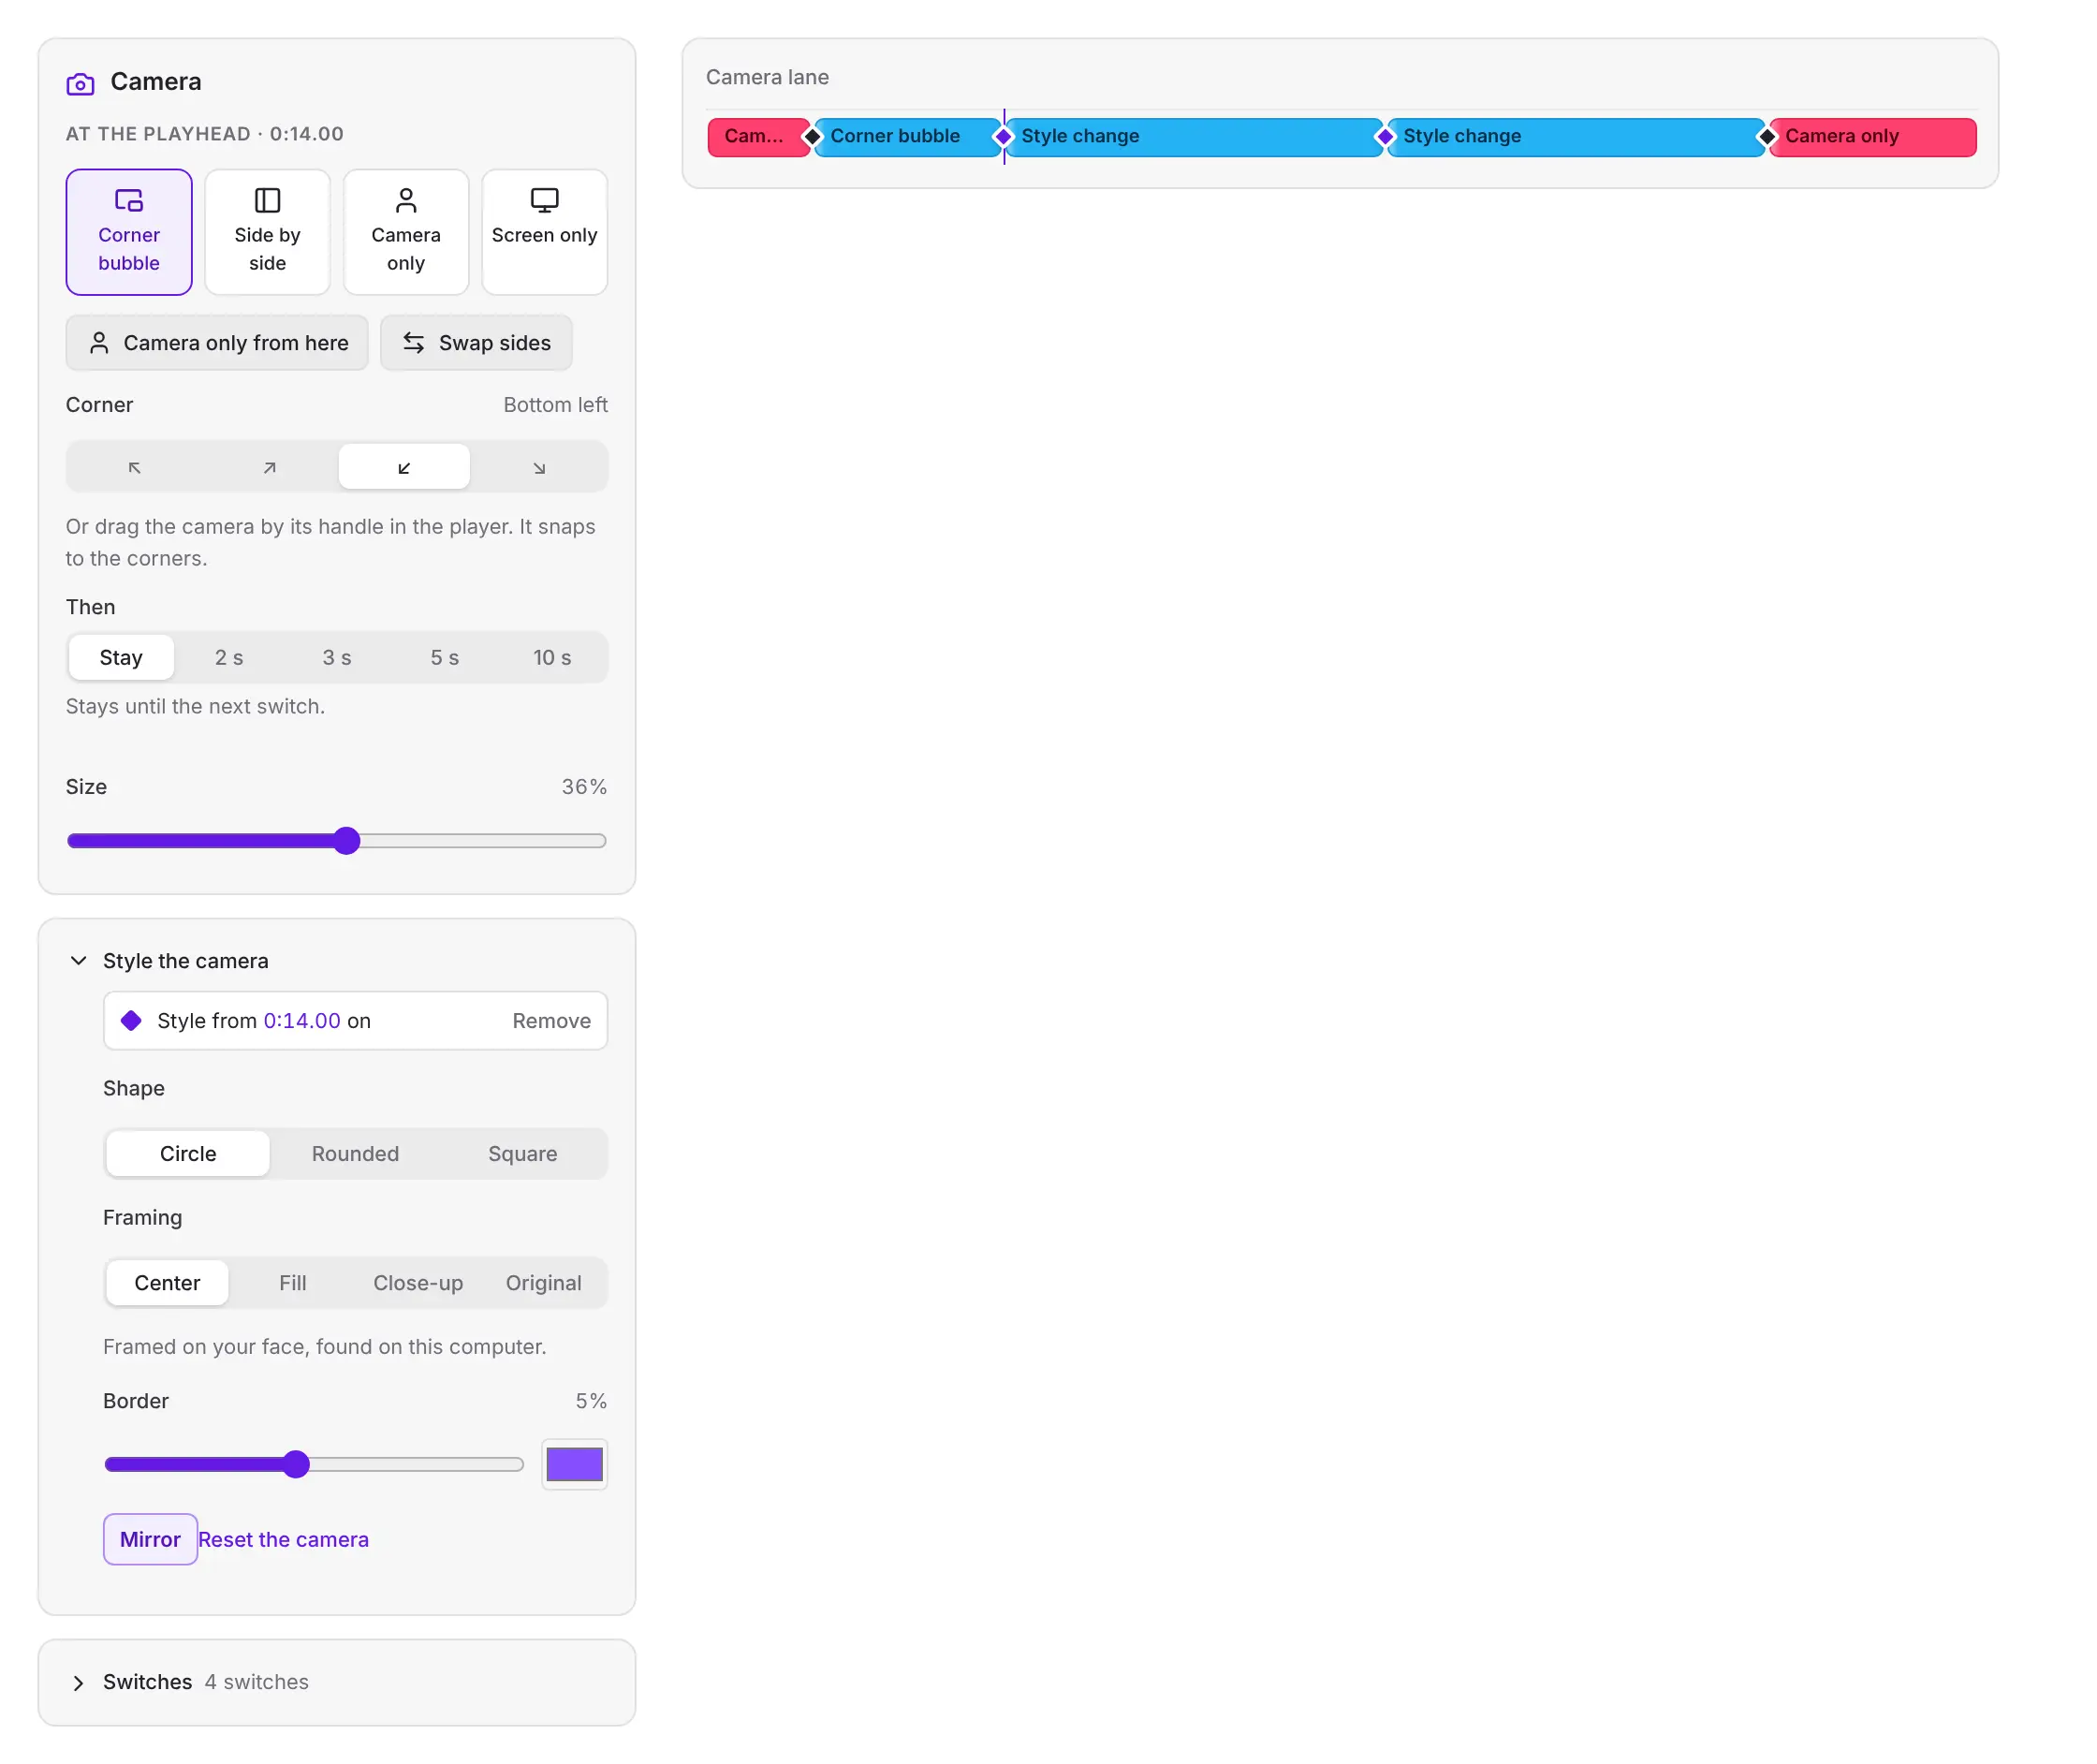
Under Style the camera, pick a Shape (circle, rounded or square), a Framing, a Border and its color, and whether it is mirrored.
- Center keeps your face in the middle with room above your head.
- Fill brings your head and shoulders closer.
- Close-up shows your face only, for small bubbles.
- Original shows the whole camera picture.
On a Mac, Cropped finds your face in the recording on your computer. On Windows and Linux, framing uses the middle of the camera for now.
Change the style partway through
Style keyframes change the camera from a point in the video on. Grow the bubble while you introduce yourself, shrink it when the screen matters, or switch to a violet border for a new section.
- Put the playhead where the change should start.
- Under Style the camera, click Keyframe here. Nothing changes yet: the keyframe starts with the style that's showing.
- Change the Size, Shape, Framing or Border. The camera moves into the new style with your switch feel, and keeps it until the next style keyframe.
The line at the top of Style the camera says which style the controls change: the whole video, or the keyframe showing at the playhead. A style keyframe is a purple diamond on the Camera lane. Drag it to move it. With the playhead on one, Remove takes it out, and the style before it carries on. Size, shape, framing and border all change smoothly into the new style: a circle opens into a rounded square, a border grows or changes color, and the framing glides.
Style keyframes work on Mac, Windows and Linux, in the preview and the export. Your AI app can set them too (see Let your AI use transitions, camera looks and styles).
Style the video
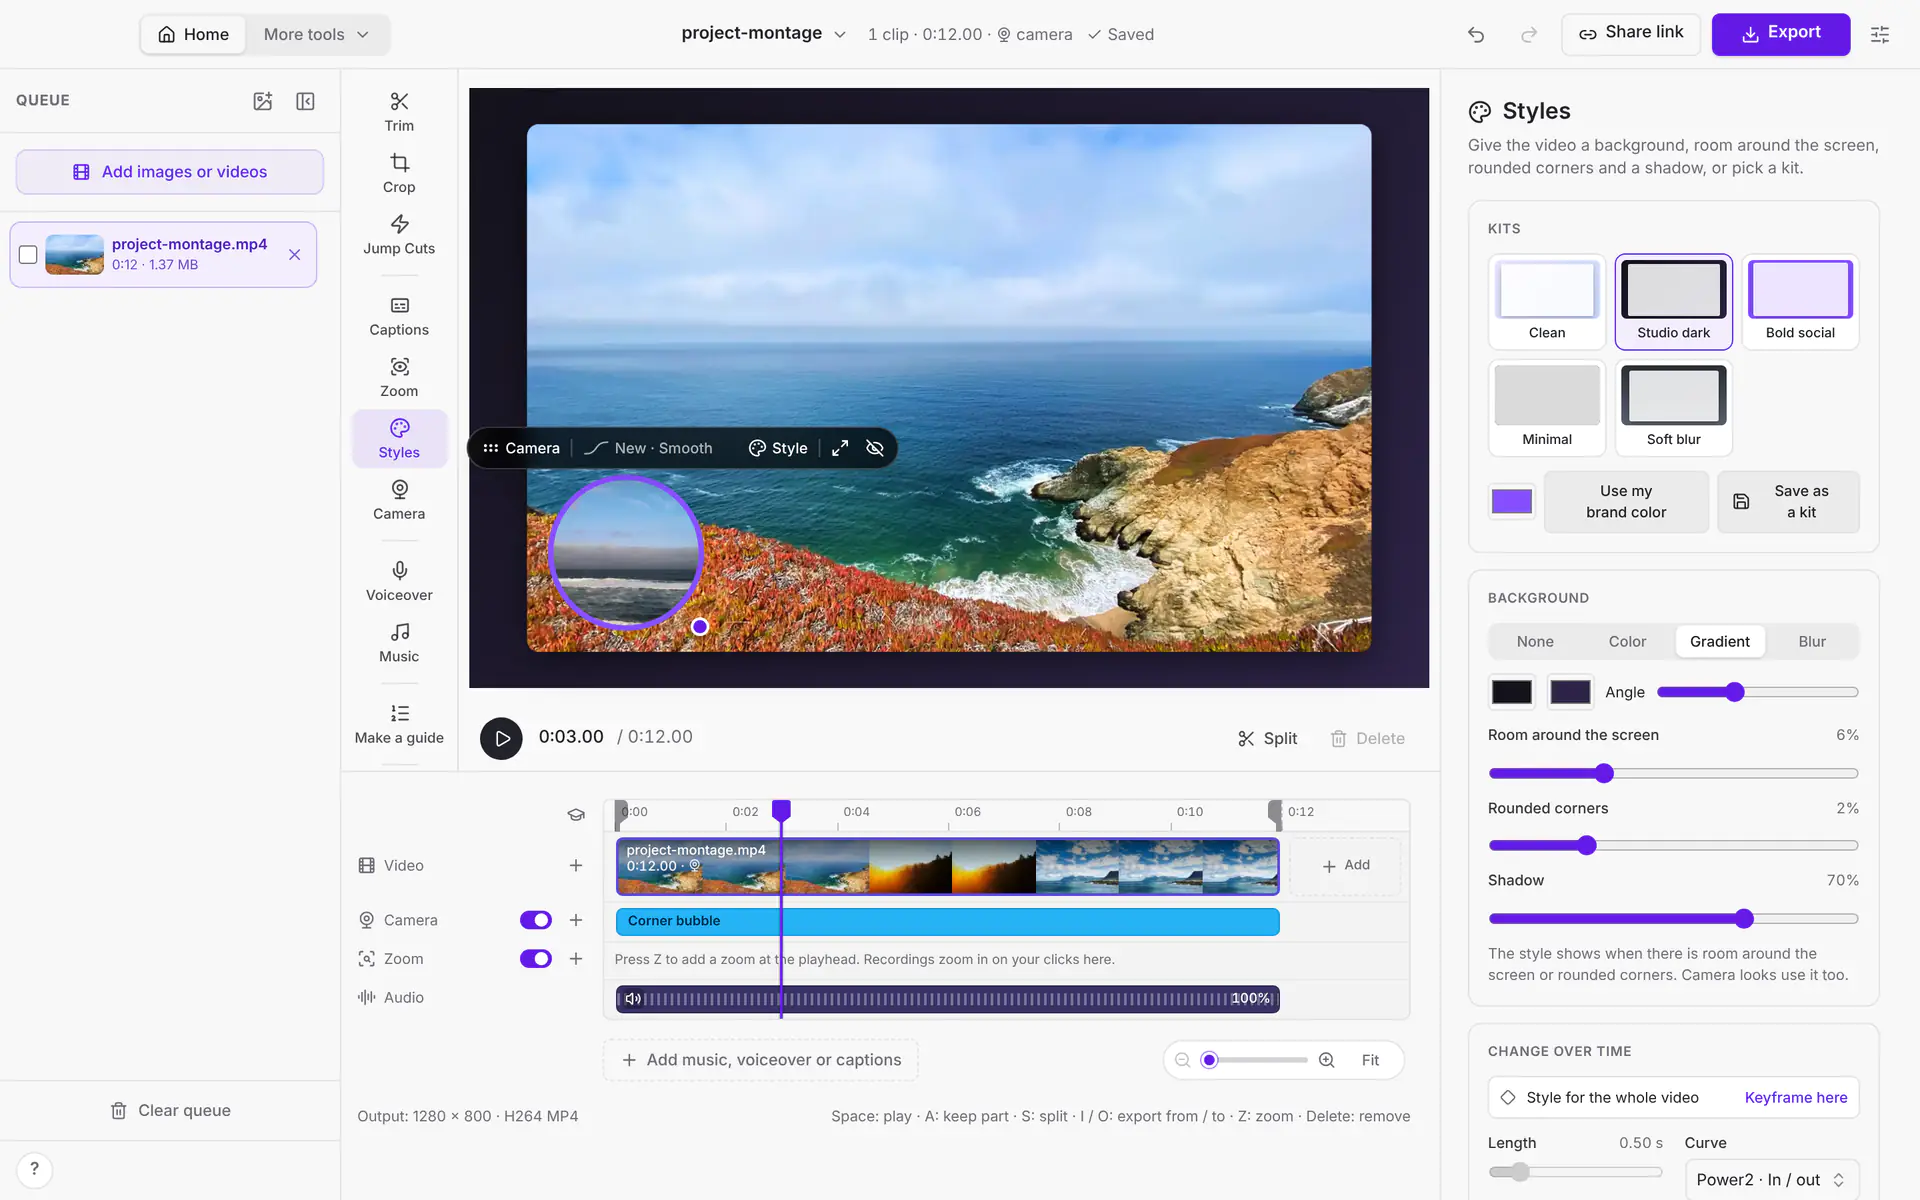
Click Styles in the tool column to frame the whole video. It works on any video, with or without a camera:
- Pick a kit: Clean, Studio dark, Bold social, Minimal or Soft blur. Or click Use my brand color.
- Set the Background (a color, a gradient or the video itself blurred), the Room around the screen, Rounded corners and Shadow.
- Click Save as a kit to keep a style on this computer for other videos.
Edges and outlines
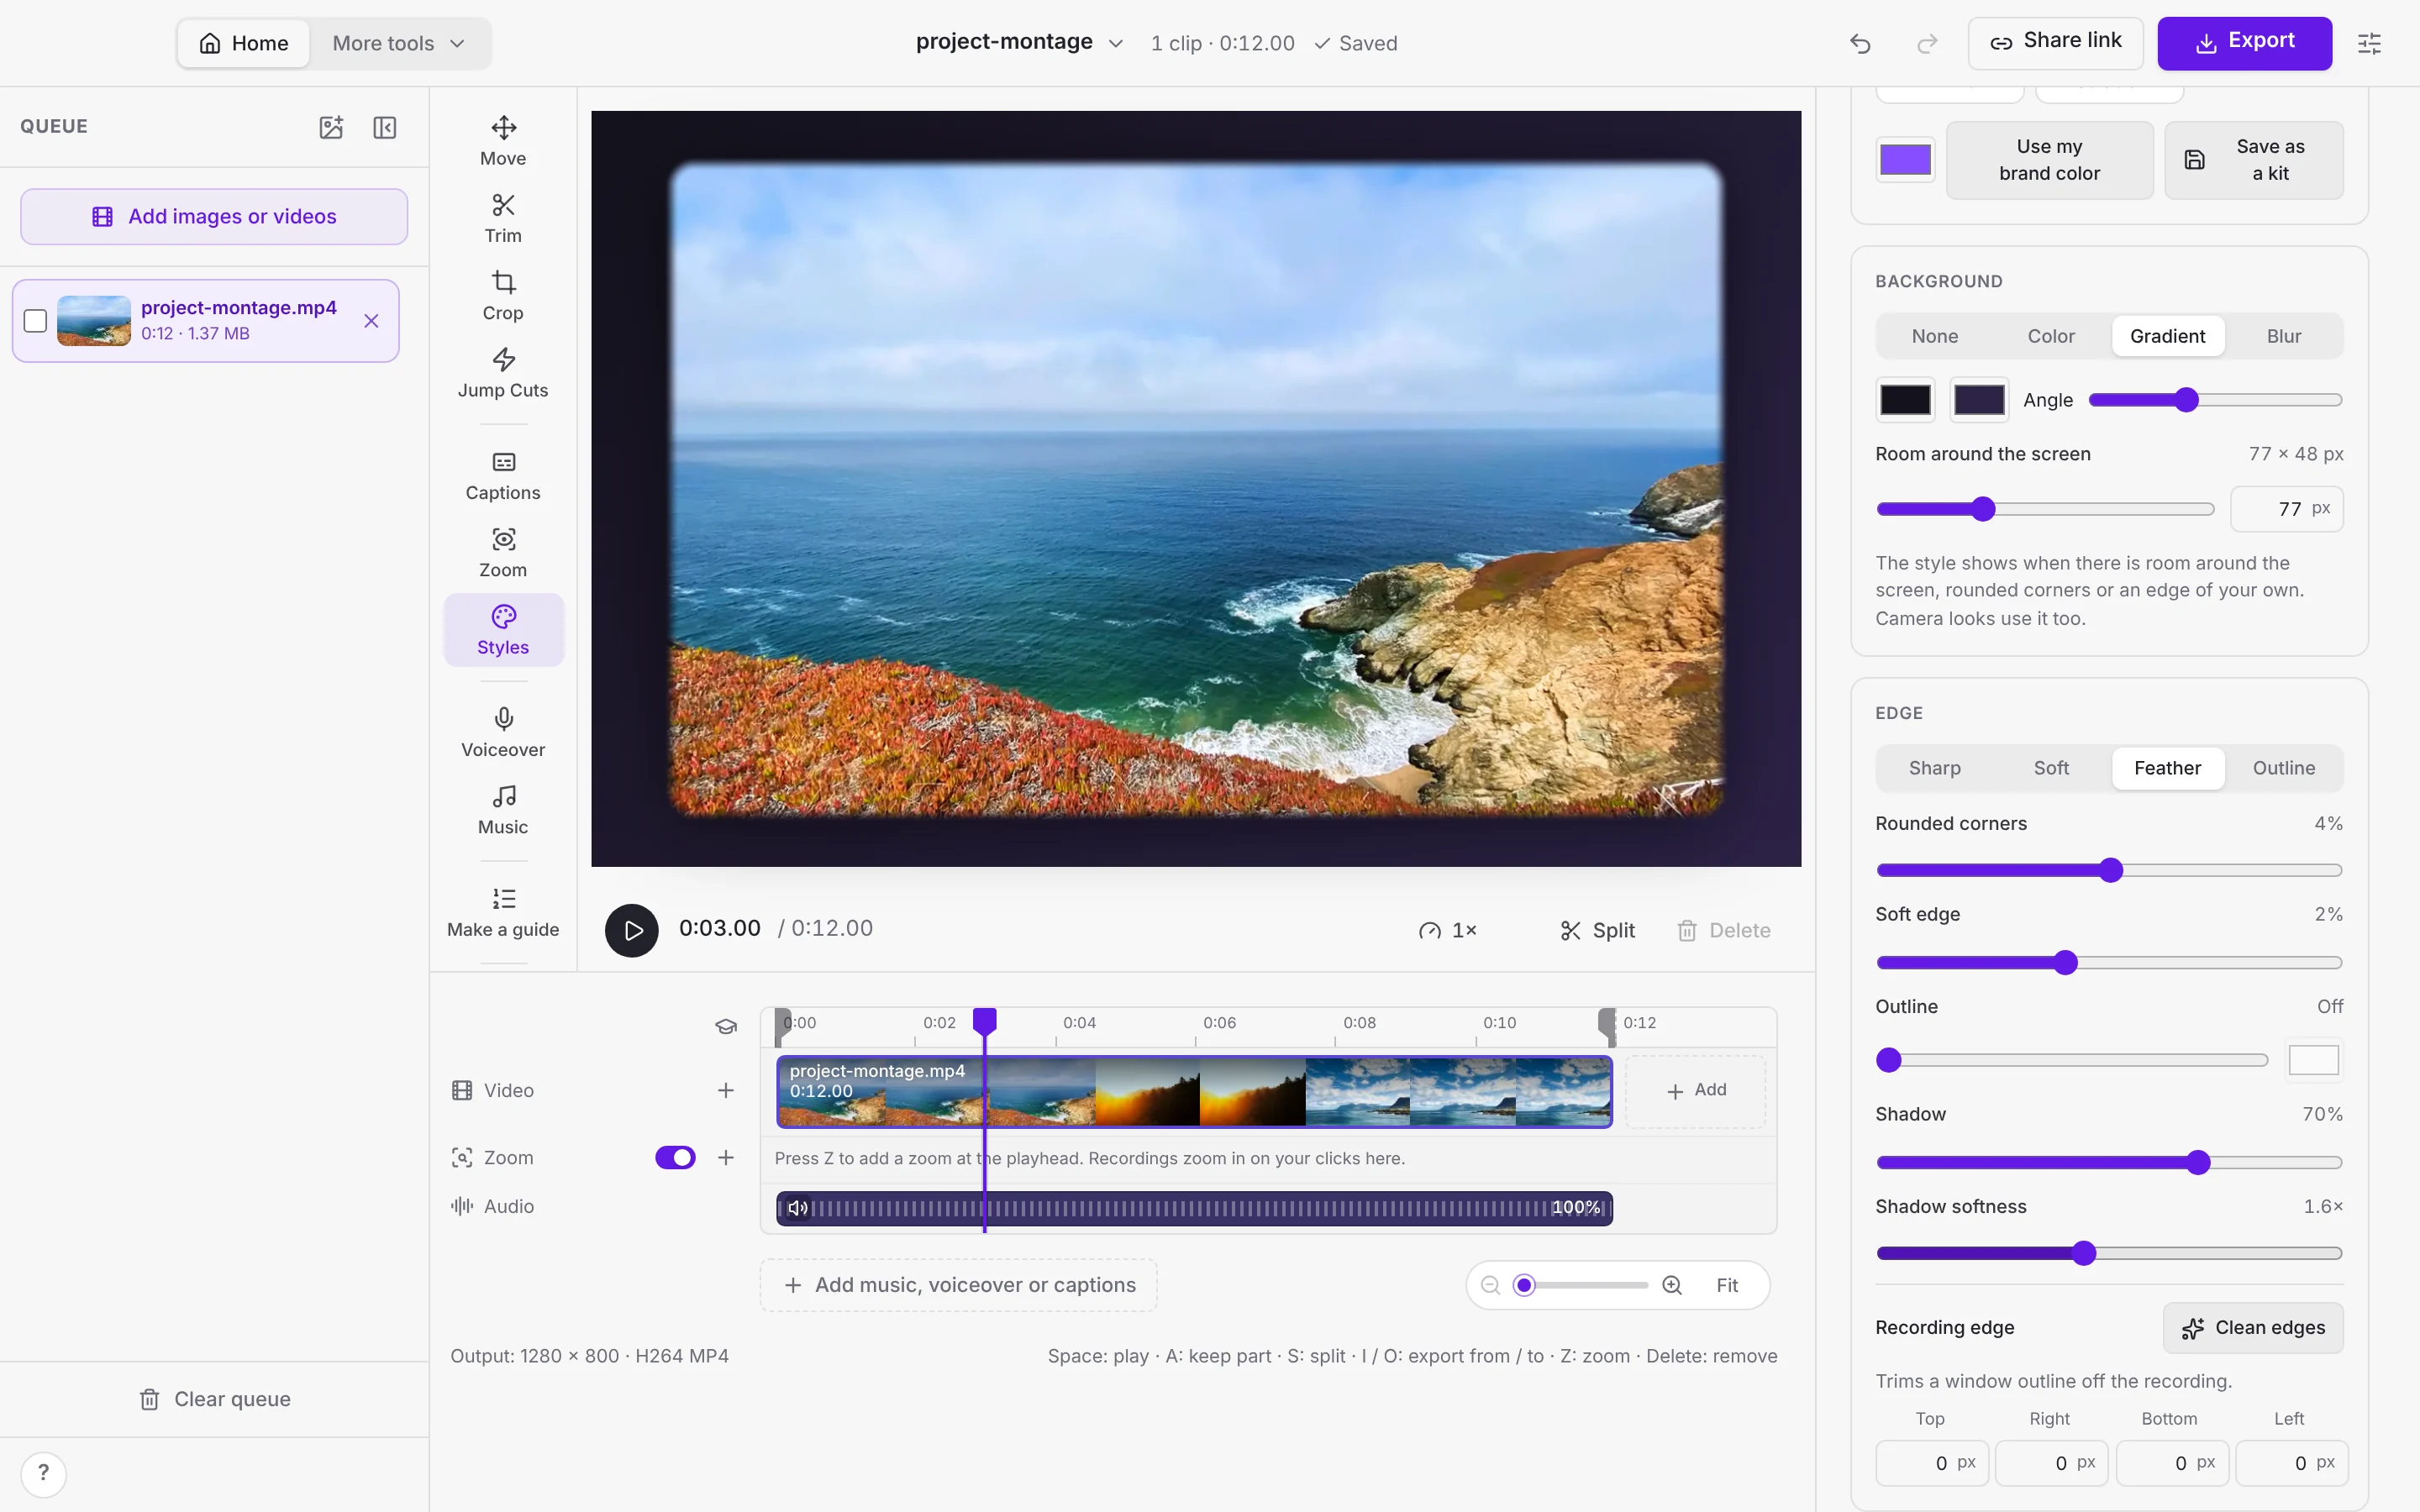
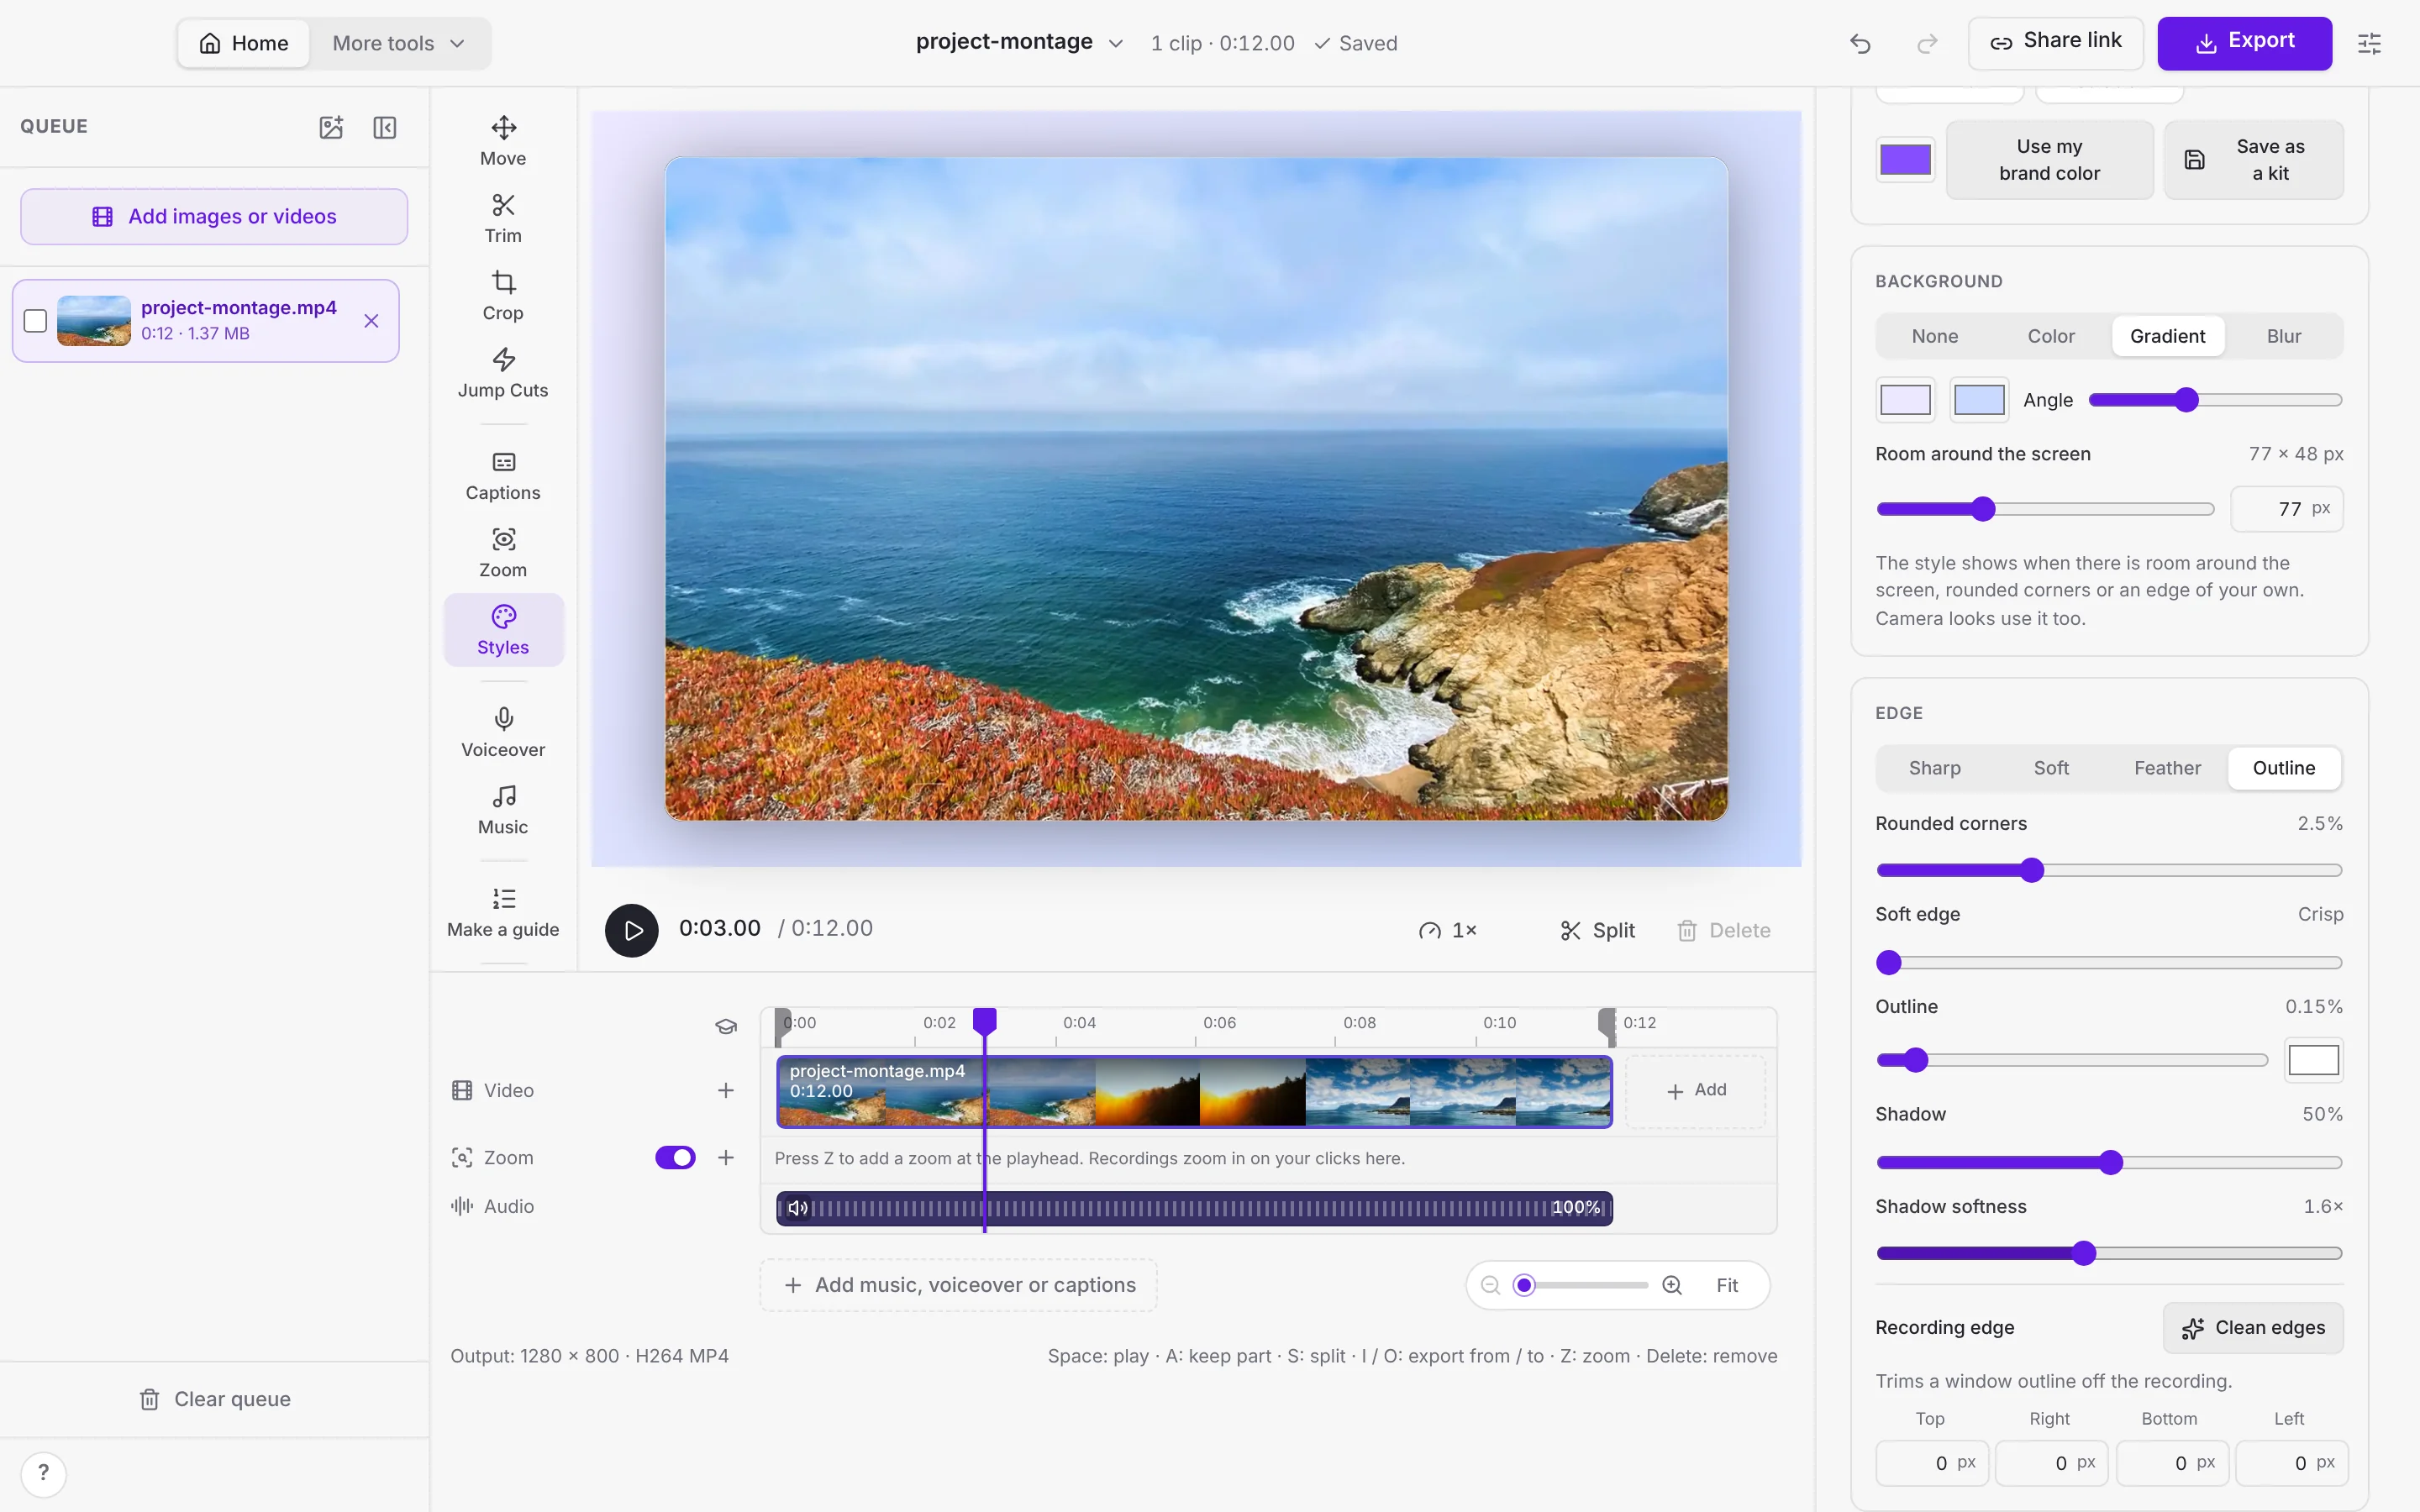
Under Edge in Styles, pick how the screen's edge looks: Sharp, Soft, Feather (rounded corners that fade gently into the background) or Outline (a thin, clean outline in a color you choose). Rounded corners, Soft edge, Outline and Shadow softness each have their own slider, and picking a kit keeps the edge you chose. Room around the screen shows its size in pixels, and you can type an exact value.
Recordings sometimes bring their own outline with them, such as a window's thin keyline, the Windows accent border or a stray dark row. Clean edges, under Recording edge, finds it on the frame at the playhead and trims it off, so only your own edge shows. Press ⌘ Command + Z (Windows and Linux: Ctrl + Z) to undo it.
Change the video style over time
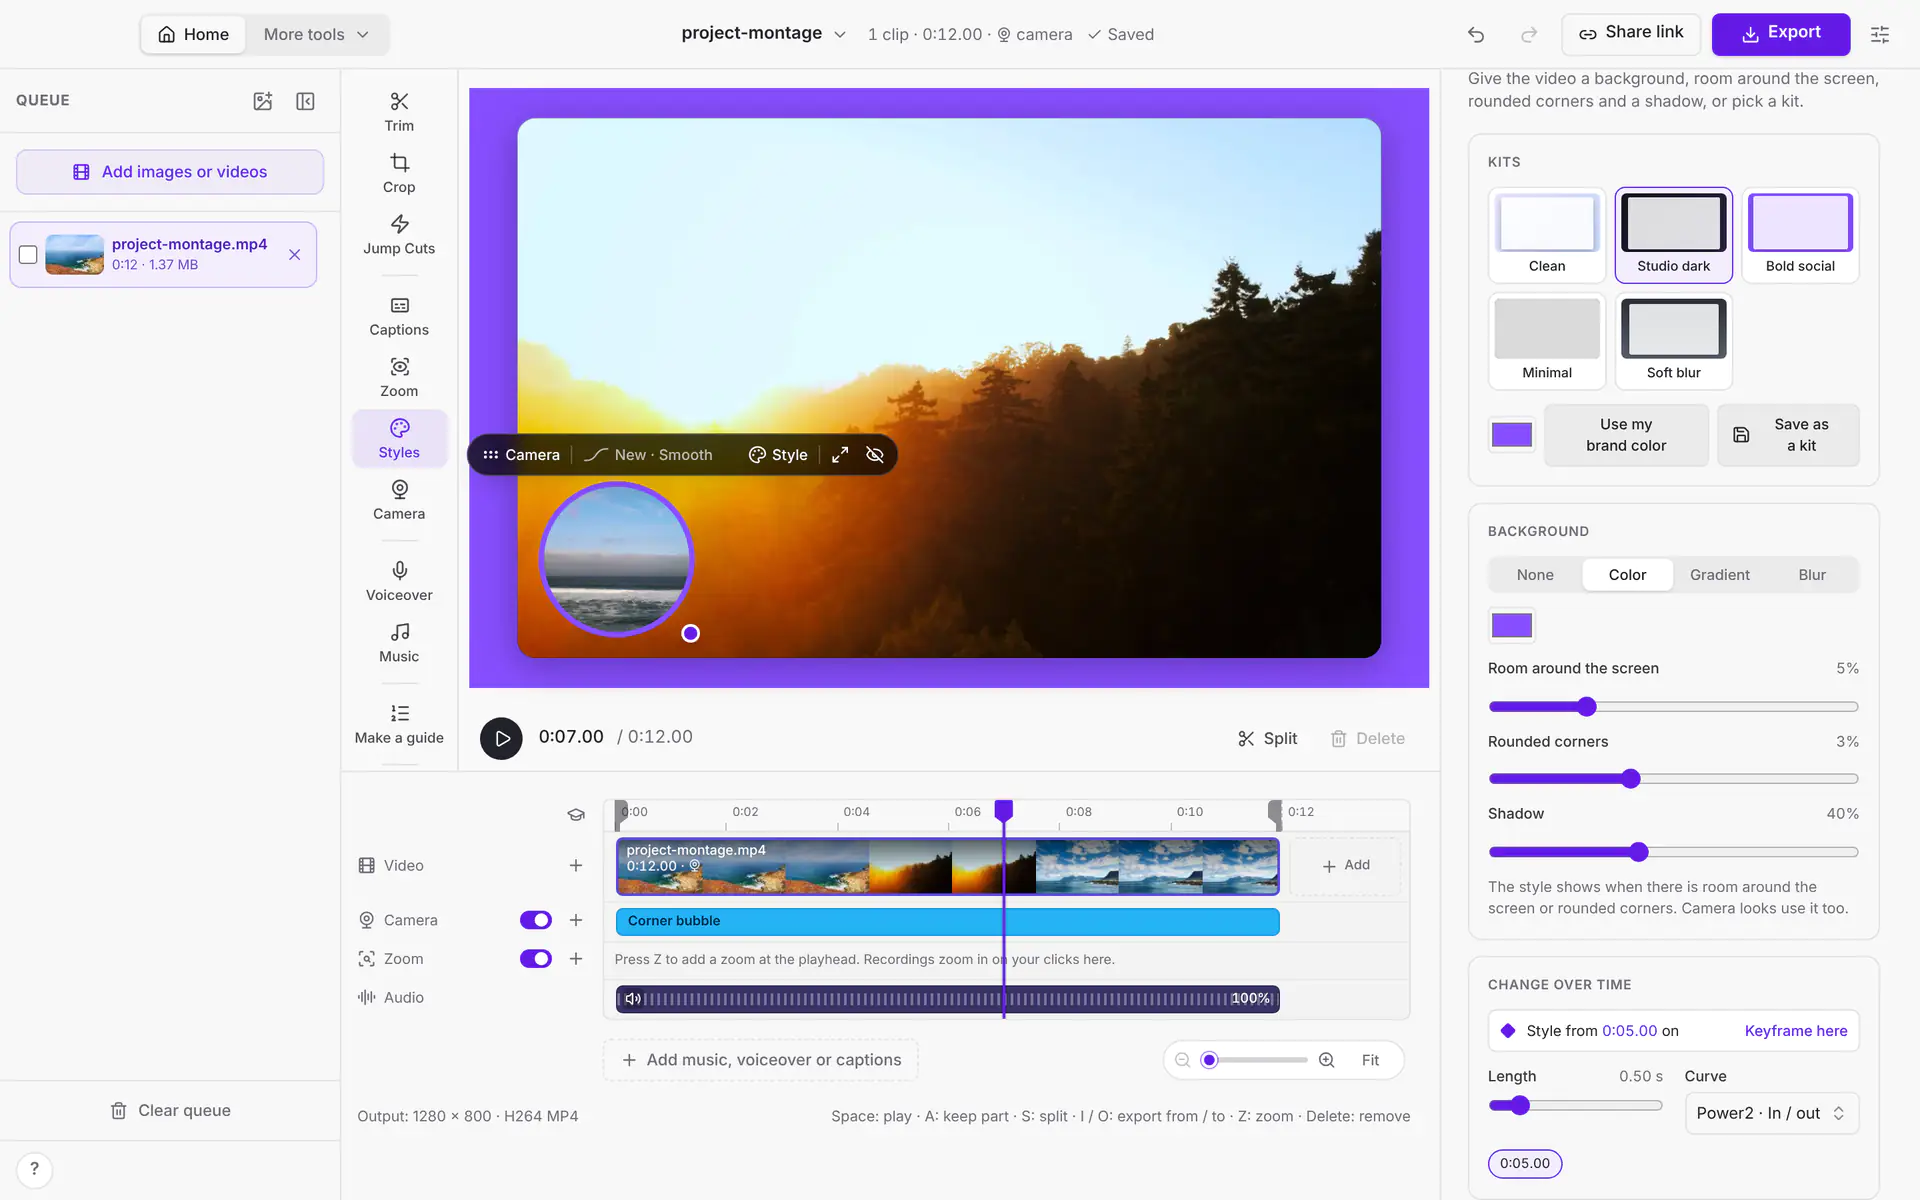
The style can change partway through too. Open with the screen full size, then ease into a framed look with room and a soft shadow once you start talking, or switch to a new background for a new section.
- Put the playhead where the change should start.
- Under Change over time in Styles, click Keyframe here. Nothing changes yet: the keyframe starts with the style that's showing.
- Change the Background, Room around the screen, Rounded corners or Shadow, or pick a kit. From the keyframe on, the video eases into the new style and keeps it until the next style keyframe.
- Set the Length (up to 3 seconds) and the Curve of the change. A length of 0 changes at once.
The line under Change over time says which style the controls change: the whole video, or the keyframe showing at the playhead. The times under it are your style keyframes; click one to go there. With the playhead on one, Remove takes it out, and the style before it carries on. The room around the screen moves the screen along the curve, and a new background, corners or shadow blend across over the same length. You can add up to 20 style keyframes to a video. An export of part of the video starts with the style showing at its start.
Video style keyframes work on Mac, Windows and Linux, in the preview and the export. Your AI app can set them too.
The export draws exactly what the preview shows, and a share link made from the export shows it too. After you change the camera or the style, export again so the file and its link have the change. Videos you optimize from the Drop Zone or the capture card keep their camera as well. Camera looks and styles are saved in your project.
Share link from the Studio offers the export as Optimized and, for a recording with a camera or any edit, Full Resolution: the video as you edited it, at the recording's own size and quality. Cropped renders it first (it is saved beside your export as "… full resolution") and then sends it, so the camera and every edit are in the link either way. A video with no edits sends its own file as Full Resolution. Before you export, Share link renders the edited video the same way, so the camera is in the link even then. On the capture card, and with Copy a share link after a recording, a recording with the camera is linked once its optimized copy is made, with the camera in it. The recording file itself keeps the camera as a hidden second track that browsers don't play, so Cropped never links it bare.
Still stuck? Click the ? button at the bottom left of the Cropped Studio to ask, send us a message, or request a feature.